Overview
This document describes how to use the Heartland Restaurant Guest app. Heartland Restaurant offers customers the ability to order items and gift cards from restaurants through the use of a mobile device application compatible with iOS and Android hardware. Currently, the Heartland Guest app enables customers to earn, track, and spend loyalty rewards from their favorite locations. The application is broken into two main functions:
Configure the Guest App
Once the Guest app is enabled for an account, you can configure it in the App Ordering screen, which includes controls that enable you to select the ordering options and settings of the Guest app. To access the App Ordering screen, log onto the Admin Console, select the account using the Guest app. In the Main Menu, select Location Setup, then select App Ordering.
General Tab
The controls on the General tab enable you to configure the app’s appearance, as well as select the menu items that will be available to order in the app.
Menu & Hours: You can use the controls in this area to designate the days of the week and times of each day when the items of specific menu groups are available for purchase in the POS. If you click , the program will add one set of controls to the area. You can use these controls to set the availability time for one menu group. You can add multiple menu groups (with separate start and end times) to a single week. Note that you cannot add multiple weeks, once you select a day of the week you will not be able to select that day of the week again; doing so will remove it from the other menu group that day was selected.
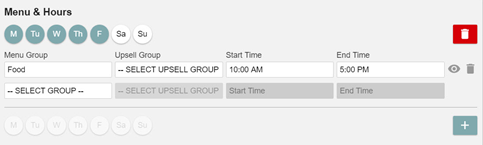
By selecting one or more of the day buttons, you can designate which days of the week the items in the menu groups are displayed in the Guest menu screens.
In the Menu Group list, select the menu group whose items you want to make available during the selected days of the week.
In the Upsell Group list, you can associate a main group with an appropriate upsell group. When a server orders items in the main group, the Guest app will apply the rules set in the upsell group.
In the Start Time and End Time boxes, you can set the time range within each day that the items in the main group are available in the Guest app. When servers order items in this menu group, the Guest app will only display controls for delivery service within the time range you set here. By setting a start time and end time, you set the time range during each selected day that the items in the menu groups are displayed in the Guest menu screens.
App Settings: You can use the controls in this area to set the general appearance of the app.
The Set Logo box enables you to set a logo graphic, which the Guest app will display. If you click the Set Logo box, the program opens the Set Logo window, displaying the site’s collection of uploaded graphic files. To add a new graphic to the collection, click Upload New Image. The program will open a browser window, allowing you to find and select a graphic on the network. After uploading the graphic to the collection, you can then select it, and the Guest app will display it as the site’s logo.
The Set Banner box enables you to upload a graphic that the Guest app will display as a background banner. If you click the Set Logo box, the program opens the Set Banner window, displaying the site’s collection of uploaded graphic files. To add a new graphic to the collection, click Upload New Image. The program will open a browser window, allowing you to find and select a graphic on the network. After uploading the graphic to the collection, you can then select it, and the Guest app will display it as a background banner.
In the Assigned iPad list, you can select the iPad device that will receive and process all app orders.
If you click the Primary Color box, the program will open a color selection panel. In this panel, you can select a color. The Guest app will use that color as the primary color in its Log In and other screens.
Slide Show Images: You can use the controls in this area to configure the location’s slide show within the Guest app.
The Set Ad box enables you to add a graphic to the slide show. If you click the Set Ad box, the program opens the Set Ad window, displaying the site’s collection of uploaded graphic files. To add a new graphic to the collection, click Upload New Image. The program will open a browser window, allowing you to find and select a graphic on the network. After uploading the graphic to the collection, you can then select it.
The Slide Show Images area includes three Set Ad boxes, enabling you to add up to three images to the slide show.
In the Ad Duration box, enter the number of seconds that the Guest app should wait before changing each slide.
Send Tickets Unassigned: If you select this check box, the POS will not automatically assign a server to new tickets received from the Guest app. Rather, the POS will assign the ticket to the last server to access and save changes to the ticket.
Auto Close Tickets: If you select this check box, the POS will automatically close tickets from the Guest app when they are paid in full.
Carryout Enabled: If you select this check box, the app will display the option to designate orders for carryout service.
Carryout Room: In this list, you can select a room for carryout orders. The POS will associate all carryout orders and sales received from the Guest app with this room.
Eat In Enabled: If you select this check box, the apps will display the option to designate orders for eat-in service.
Eat In Room: In this list, you can select a room for eat-in orders. The POS will associate all eat-in orders and sales received from the Guest app with this room.
Skip the Line Tab
The controls on the Skip the Line tab enable you to configure additional settings in the Guest app.
Skip the Line Enabled: If you select this check box, the program will enable the Skip the Line features for the Guest app.
Ticket Prefix: If you type a word or phrase in this box, the POS will print it at the top of all ticket for orders received from the Guest app.
Allow Credit: If you select this check box, the app will display a payment option to allow customers to pay for an order with a credit card.
Allow Gift: If you select this check box, the app will display a payment option to allow customers to pay for an order with a gift card.
Allow Pay in Person: If you select this check box, the app will display a payment option to allow customers to pay for an order “in person” with cash when the order is delivered or picked up.
Using the Guest App
Creating a New Account
- Run the Heartland Restaurant Guest app.
- In the Login screen, tap Create an Account.
- In the Create your Account screen, enter your first and last name in the First Name and Last Name boxes, then tap Continue.
- Enter your email address in the Email box, then enter a password in the Password and Confirm Password boxes, then tap Continue.
The app will create your account and send you an email with a six-digit verification code. When you log into your account for the first time, the app will prompt you to enter the verification code.
Logging into the App
- In the Log In screen, tap Log In.
- In the Log In screen, enter your email address in the Email box and your password in the Password
- Tap Log In.
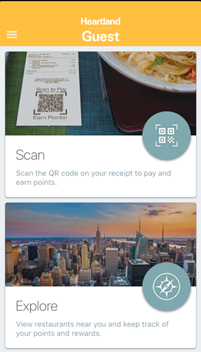
The app displays the Heartland Guest screen.
Scanning the QR Code on a Receipt
Some sites may print QR codes on their receipts, enabling you to scan the receipt and pay the ticket with the app.
- In the Heartland screen, tap Scan.
- Hold the device over the receipt and scan the QR code.
When the app successfully reads the code, it will display the Checkout screen.
Placing an Order
Finding a Local Restaurant
- In the Heartland screen, tap Explore.
- If the app does not have permission to use Locations Services, tap Go to Settings, then set the device to allow the app to use Location Settings.
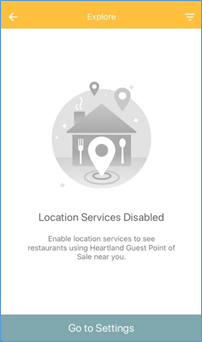
The device cannot search for local sites until it can use Location Services. Once it has access to Location Services, the app will display the Explore screen, listing all restaurants in your local area. In each site’s button, the app displays the site’s name, address, and distance from your device.
If you have ranked a site in the past, the app may also display your ranking. If you have enrolled in a site’s loyalty program, the app may display the number of points needed to earn the next reward.
- Scroll through the list, find and tap the desired sites tile.
If the site has more than one location, the app will display a screen listing all of the site’s locations. The app will display each location along with their street address and distance. - Select a desirable location.
The app will display the Location’s information, including the site’s location on Google Maps and the site’s street address. If you have rated the location before, it will display your rating. If you are enrolled in its loyalty program, it will also display your current reward points and how many you need to earn another reward.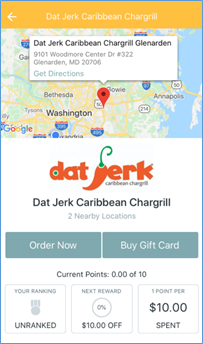
Select the Carryout or Delivery Service
- In the Location’s screen, tap Order Now.
The app displays the Order Now screen, which may include the Carryout option, Delivery option, or both, depending on the site’s settings in the Admin Console. - Tap Carryout or Delivery.
If you select Carryout, the app will display the When area, with options that enable you to schedule a pickup time. If you select Delivery, the app will also display the Enter a new address option.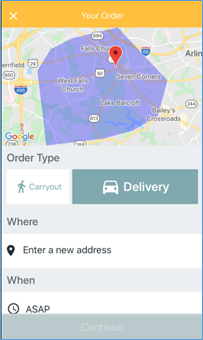
- In the Enter a new address screen, enter the delivery address. As you do, the app will use Location Services to find the address you are entering. When you see the right address, select it.
- If you are placing a delivery order, tap Enter a new address.
- If you want the site to prepare the order immediately, tap ASAP.
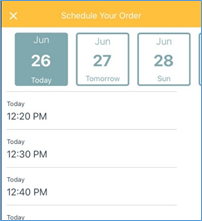
- If you want the site to prepare the order at a future time, tap Schedule your order.
- In the Schedule Your Order screen, select the date and time of day when you want to pick up your order.
- In the Your Order screen, tap Continue.
The app will open the Menu screen.
Order Items in the Menu
The site’s Menu screen displays a list of menu available for order.
- If the site features multiple menu groups, select an appropriate menu group in the screen’s header (such as Breakfast, Lunch, Beverages, and Dinner).
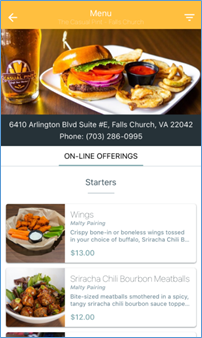
- In the screen, scroll through the list and tap an item that you wish to add to the order.
The app will display the item’s information.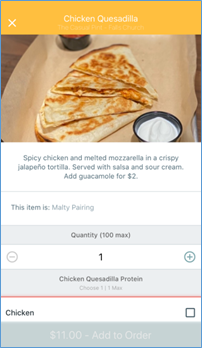
- In the Quantity area, select the number of the item that you want to add to the order.
- If you want to add one or more modifiers to the item, select them in the Mods
- If you want to add any special instructions to the item, tap Special Instructions and then type the instructions in the box.
- Tap Add to Order.
The app will add the item to the order and display the menu screen. You can continue to browse the menu groups and add other items to your order.
Pay for the Order
- When you are ready to pay for the order, tap Checkout.
The app displays the Your Order screen, which lists the items in your order, the order’s pickup or delivery time, and the ticket’s subtotal and total.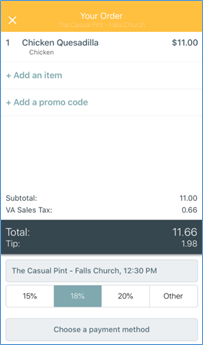
- If tip options have been defined, you can tap a tip option to add a tip to the check.
- To add another item to the order, tap Add an Item. The app will return to the Menu screen.
- To enter a promotional code to the order, tap Add a promo code, enter the code in the Promo Code window, then tap Apply.
- Tap Choose a payment method.
The app will display the Payment Method screen. Depending on the settings in the Admin Console, the Payment Method may display multiple payment options.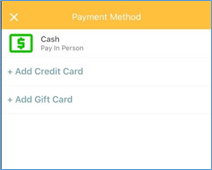
- To pay cash for the order when it is delivered or when you pick it up, tap Cash.
- To pay with a credit card, tap Add Credit Card.
The app will display a panel, prompting you to enter your credit card’s number, expiration date, and CVV.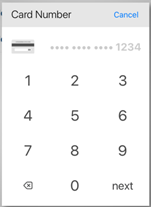
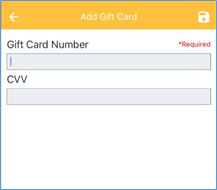
- To pay with a gift card, tap Add gift card.
- In the Add Gift Card screen, enter the card’s number in the Gift Card Number box and the card’s CVV in the CVV box.
After you enter a payment method, the app will return to the Your Order screen. - Tap Pay Now.
- In the Please Confirm prompt, tap Submit.
The app will submit the order to the site.
Ordering a Gift Card
- Tap Explore and select a local site that offers gift cards.
- In the site’s screen, tap Order Gift Card.
If the account has more than one location, the app will list all local locations. - Select the desired location.
The app will display the Gift Card screen, listing all of the gift cards available for purchase. - Select the gift card you want to buy.
- In the next screen, enter the following information:
The amount of the gift card.
The recipient’s email address.
Your name.
A message to the recipient.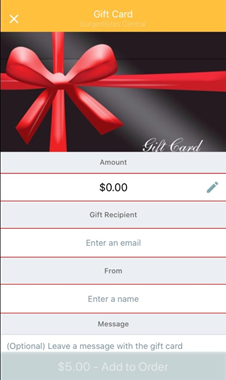
- After entering the necessary information, tap Add to Order.
- Tap Checkout.
In the Checkout screen, you will see the gift card added to the ticket. - To order any menu items with the gift card, tap Add an item to view the location’s menu.
- To pay for the gift card immediately, tap Choose a payment method and follow the same payment procedures used for paying a carryout or delivery order.
After you submit the payment, the app will email the gift card to the recipient’s email address.
Editing Your Profile Information
To review or edit your profile information, access the Heartland screen and tap . The app displays the Settings menu.
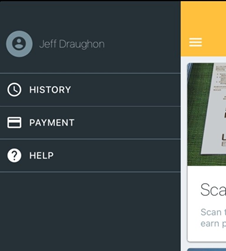
If you tap your name, the app will display the My Profile screen. In this screen, you can edit the following personal information:
- Name
- Phone number
- Email address
- Password
- Birthday date
If you tap History, the app will display the Order History screen, which lists all of your previous orders.
If you tap Payment, the app will display the Saved Payment Methods screen. This screen allows you to create a default payment method for purchases made with the Guest app. If you tap Add Credit Card, the app display the keypad, enabling you to enter a card number, expiration date and CSV of a credit card.
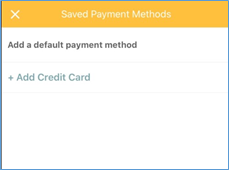
After saving the card information, that card will display as an option in the Payment Method screen.
If you tap Help, the app will display the Help screen. In this screen, you can review the following:
- The app’s version number.
- Terms and Conditions
- Privacy Policy