Overview
This document describes how to set up and create an Online Ordering website for a location. It includes details descriptions of the controls in the Global Payment Restaurant’s Admin Console that are required for defining an Online Ordering website and configuring the features and services that the website have provide customers. This document also describes the procedures for using the Online Ordering website to create an order for carryout or delivery service.
Configuring Online Ordering
The following sections describe the controls in the Admin Console that you can use to create an Online Ordering website for a location, and how to configure it to include or exclude various services and features. These controls are accessible in the Online Ordering screen. To Access the Online Ordering screen, log into the Admin Console. In the Main Menu, select the appropriate account, select the appropriate location, then click Location Setup, then click Online Ordering.
Online Ordering Screen
The Online Ordering screen includes controls that allow you to configure the Online Ordering service. If your site plans to use Online Ordering, you can use these controls to edit the appearance and performance of the site’s Online Ordering webpage.
General Tab
The General tab includes controls that determine the appearance and performance of the website.
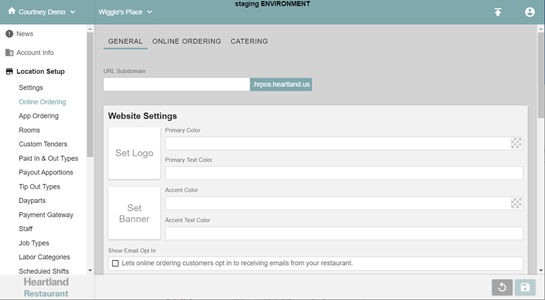
URL Subdomain: If you are configuring your site to use Online Ordering, you can enter the URL subdomain of the location’s website in this box. Once a subdomain has been provided, you can click the .hrpos.heartland.us button to launch the online ordering page in a new browser tab.
Website Settings
Set Logo: If you click the Set Logo box, the program opens the Change Logo window. To add a graphic to the logo collection, click Upload Image (+), browse your local drive, and select an appropriate graphic. The program will upload to graphic to the logo collection. If you double-click a graphic in the collection, the program will display that graphic as the logo on the site’s Online Ordering website. To remove a graphic from the collection, select the graphic and click Remove Image. To close the Change Logo window, click Close.
Set Banner: If you click the Set Banner box, the program opens the Change Banner window. To add a graphic to the banner collection, click Upload Image (+), browse your local drive, and select an appropriate graphic. The program will upload to graphic to the banner collection. If you double-click a graphic in the collection, the program will display that graphic as the banner on the site’s Online Ordering website. To remove a graphic from the collection, select the graphic and click Remove Image. To close the Change Banner window, click Close.
Primary Color: The Primary Color box enables you to set the color of the background in the site’s webpage. If you click this box, the program displays a color panel. In this panel, you can select an appropriate color.
Primary Text Color: The Primary Text Color list enables you to set the color of the primary text that displays in the site’s webpage. In this list, you can select either black or white.
Accent Color: The Primary Color box enables you to set the color of the background in the site’s webpage. If you click this box, the program displays a color panel. In this panel, you can select an appropriate color.
Accent Text Color: The Accent Text Color list enables you to set the color of the accent text that displays in the site’s webpage. In this list, you can select either black or white.
Show Email Opt In: If you select this box, the program will include controls on the site’s webpage that enables customers to enter a personal email address and agree to receive email content from the site. The site can then collect those email addresses and send marketing materials to those customers.
Please note:
- Heartland Restaurant will only store email addresses if Loyalty is enabled.
- If merchants wish to send marketing materials to customers who have opted in, they must use Heartland Email Marketing for this purpose.
Assigned iPad: This list enables you to select the specific iPad device that will receive and process orders entered at the site’s webpage.
Disable Special Instructions: Normally, the site’s webpage includes controls that enables customers to add special instructions to an order. If you select this check box, the program will not display those controls.
Confirmation Email: If you enter an email address in this box, the program will send a copy of every confirmation email sent to customers who create orders on the webpage. If you enter more than one email address in his box, separate them with semicolons.
Send Tickets Unassigned: If you select this check box, the program will send new checks created in the webpage to the POS with no assigned server, and it will automatically assign the check to the first server that opens the check.
Google Analytics Tracking ID: If you use the Google Analytics tool to manage the site’s webpage, you can enter the page’s tracking ID number in this box.
Google Tag Manager ID: If you use the Google Tag Manager tool to manage the webpage’s tags, you can enter the tag manager ID number in this box.
Site Preview
This program displays a preview of the site webpage in this panel. When you edit the appearance of the webpage, the panel enables you to preview the new appearance before saving your settings.
Online Ordering Tab
The Online Ordering tab includes controls that allow you to include or exclude certain functions from the Online Ordering webpage, including carryout and delivery service.
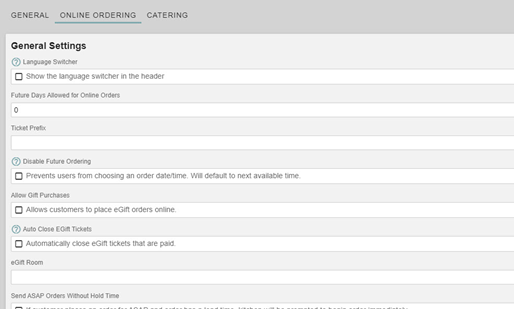
General Settings
Language Switcher: If you select this check box, the Online Ordering website will display the Language switch in the header of the Online Order website. The Language switch enables customers to change the language of the labels displayed in the Online Ordering website. By default, the Online Ordering website uses the language selected in the browser’s settings, but the Language switch allows customers to override the default setting and view the website in another language. Currently the two options are EN for English, or ES for Spanish. (Currently, we only support the Spanish (United States) option in the browser's language settings, not the Spanish option.)
Future Days Allowed for Online Orders: This box allows you to set a limit on the maximum number of days before the current day that a future order can be placed through the Online Order webpage. If you enter a number in the box, Online Ordering will only accept future orders made for dates within the range of that number of days. For instance, if you enter “10”, the POS will only allow servers to create future orders for dates within ten days of the current day.
Ticket Prefix: In this box, you can designate a prefix for all online order tickets created in the webpage so they can be easily identified. You can set a prefix up to four characters long, such as “WEB” and “OLO”.
Disable Future Ordering: If you select this check box, the Online Ordering webpage will not display controls for selecting a future date or time. When customers create new orders through Online Ordering, the webpage will automatically assign new orders to the next available time. This setting supersedes the setting of the Future Days Allowed for Online Orders box.
Allow Gift Purchases: If you select this check box, Online Ordering will include controls that enable customers to add eGift certificates to orders and to purchase them.
eGift Room: If your site uses the gift card program, you can use this list to associate eGift orders with a room. The list includes all of the rooms you have created in the Rooms screen.
Send ASAP Orders Without Hold Time: If you select this check box, Online Ordering will remove the hold times from “ASAP” orders. When placing an order in the Online Ordering webpage, if a customer specifies preparing the order as soon as possible, the webpage will ignore the order’s lead time (if any) when it sends the order to the kitchen. Instead, the program will prompt the kitchen to begin preparing the item immediately.
Auto Close Tickets: If you select this check box, the Online Ordering website will automatically close a ticket immediately after it is paid. If you clear this check box, the program will not close a paid ticket; a staff member must close the ticket manually.
Carryout Settings
This area includes controls that enable you to configure Online Ordering to provide carryout service.
Carryout Supported: If you select this check box, the Online Ordering webpage will include Carryout as an order option, and activate the other controls in the Carryout Settings area.
Carryout Active: If you select this check box, the Online Ordering webpage will display and enable controls that customers can use to order items for carryout service.
Carryout Room: This list enables you to associate the orders and sales from carryout orders to a specific room.
Carryout Payment Types: This list enables you to specify what type of payments are acceptable for carryout orders.
- If you select Credit Card, the website will include only controls that allow customers to pay with a credit card before submitting the order. It will not include any other payment options.
- If you select In-Person, the webpage will allow customers to submit the order without payment, and to pay for the order, in person, upon pickup.
- If you select Both, the webpage will allow customers to either pay with credit cards when submitting an order, or wait and pay for the order, in person, upon pickup.
Carryout Minimum: In this box, you can enter a required minimum dollar amount for carryout orders. If you enter an amount in this box, the webpage will only allow a customer to submit an order for carryout service if the check’s total is equal or greater than this amount.
Carryout Maximum: In this box, you can enter an enforced maximum dollar amount for carryout orders. If you enter an amount in this box, the webpage will only allow a customer to submit an order for carryout service if the check’s total is equal or less than this amount.
Carryout Lead Time (in minutes): In this box, you can set a lead time for carryout orders. In you enter a number in this box, the webpage will add that number of minutes to the order’s lead time, the amount of time the webpage will hold the order before printing its prep ticket in the kitchen.
Carryout Tips Allowed: If you select this check box, the webpage will display controls that enables customers to add a tip amount to an order in the webpage before submitting the order.
Enable Curbside Pickup: If you select this check box, the Online Ordering website will display the curbside pickup option when customers select carryout service. Curbside Pickup service allows customers to add descriptive vehicle information to a ticket, which enables staff to identify customers who wish to pick up orders curb-side in front of the site.
Print Checks Immediately on Received Orders: If you select this check box in the Carryout area, the POS will print checks for carryout orders immediately upon receiving them from the Online Ordering site.
Order Completion Message: These boxes enable you to add a customized text message that will display when customers complete an order in the Online Ordering website. Using these controls, you can create a closing message for online carryout orders.
In the Title box, type a title for the message. In the Message box, type the text of the full message. In the Online Ordering website, when a customer submits an order, the website will display your custom title and message in the order confirmation screen. It will also include the custom title and message in the customer’s order confirmation email.
Delivery Settings
Delivery Supported: If you select this check box, the Online Ordering webpage will include Delivery as an order option, and activate the other controls in the Delivery Settings area.
Delivery Active: If you select this check box, the Online Ordering webpage will display and enable controls that customers can use to order items for delivery service.
Delivery Room: This list enables you to associate the orders and sales from delivery orders to a specific room.
Delivery Payment Types: This list enables you to specify what type of payments are acceptable for delivery orders.
- If you select Credit Card, the website will include only controls that allow customers to pay with a credit card before submitting the order. It will not include any other payment options.
- If you select In-Person, the webpage will not provide an option for credit card payment, and the customer will pay for the order in person when the driver delivers it.
- If you select Both, the webpage will include options to pay either with a credit card or in person.
Delivery Minimum: In this box, you can enter a required minimum dollar amount for carryout orders. If you enter an amount in this box, the webpage will only allow a customer to submit an order for carryout service if the check’s total is equal or greater than this amount.
Delivery Maximum: In this box, you can enter an enforced maximum dollar amount for carryout orders. If you enter an amount in this box, the webpage will only allow a customer to submit an order for carryout service if the check’s total is equal or less than this amount.
Delivery Lead Time (in minutes): In this box, you can set a lead time for carryout orders. In you enter a number in this box, the webpage will add that number of minutes to the order’s lead time, the amount of time the webpage will hold the order before printing its prep ticket in the kitchen.
Delivery Tips Allowed: If you select this check box, the webpage will display controls that enables customers to add a tip amount to an order in the webpage before submitting the order.
Print Checks Immediately on Received Orders: If you select this check box in the Delivery area, the POS will print checks for delivery orders immediately upon receiving them from the Online Ordering site.
Order Completion Message: These boxes enable you to add a customized text message that will display when customers complete an order in the Online Ordering website. Using these controls, you can create a closing message for online delivery orders.
In the Title box, type a title for the message. In the Message box, type the text of the full message. In the Online Ordering website, when a customer submits an order, the website will display your custom title and message in the order confirmation screen. It will also include the custom title and message in the customer’s order confirmation email.
Delivery Area
This area includes controls that enable you to define the area surrounding the site where delivery service is available. The area includes a panel that displays a map (provided by Google Maps) of the area around the site’s address.
- If you click New Polygon, the program will add a rectangular polygon inside the maps panel. You can then click and drag the polygon to the appropriate area within the map, and click and drag the nodes on the edges of the polygon to modify its shape, until it covers the site’s total delivery area.
- If you click New Polygon again, the program will add another (differently colored) polygon to the map, which you can then move and modify as needed. By adding multiple polygons to the map, you can define delivery areas with different delivery fees.
- If you click Reset Polygons, the program will reset the map to its original state. It will remove all but one polygon, and the remaining polygon will have its original default size and location.
For each polygon that you add to the map, the program will display a Delivery Fee list with a label corresponding to the color of its polygon (such as Blue Zone Delivery Fee). In each Delivery Fee list, you can select a delivery fee. (You can define delivery fees in the Adjustments window.) Later, when a customer in this delivery zone places an order, the webpage will apply this delivery fee to the check.
Below each Delivery Fee list, the program displays a corresponding DELETE button (such as DELETE BLUE POLYGON). If you click one of these buttons, the program will remove the polygon from the map.
Schedules: Carryout
The controls on this tab enables you to configure the availability of carryout service in the Online Ordering webpage.
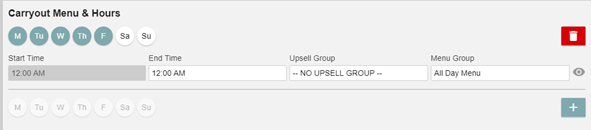
Carryout Menu & Hours: You can use the controls in this area to designate the days of the week and times of each day when the items of specific menu groups are available for carryout service in the Online Ordering webpage. If you click , the program will add one set of controls to the area. You can use these controls to set the availability time for one menu group. You can add multiple menu groups (with separate start and end times) to a single week, or you can add multiple weeks, each with different menu groups.
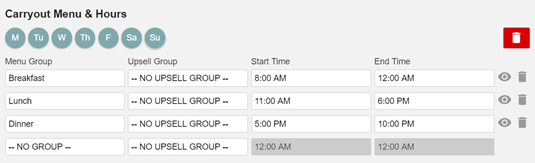
By selecting one or more of the day buttons, you can designate which days of the week the items in the menu groups are available for carryout service in the Online Ordering webpage.
In the Start Time and End Time boxes, you can set the time range within each day that the items in the main group are available for carryout service in the Online Ordering webpage. When servers order items in this menu group, the webpage will only display controls for carryout service within the time range you set here. By setting a start time and end time, you set the time range during each selected day that the items in the menu groups are available for carryout service.
You can also set menu groups with overlapping time ranges. For instance, you could set a “Breakfast” menu group with a time range of 8:00 AM to 12:00 AM, and then set a “Lunch” menu group with a time range of 11:00 AM to 4:00 PM. In such a case, if a customer accesses the Online Order website between 11:00 and 12:00, the program will allow the customer to order items from both the “Breakfast” and “Lunch” menu groups.
In the Upsell Group list, you can associate a main group with an appropriate upsell group. When a server orders items in the main group, the webpage will apply the rules set in the upsell group.
In the Menu Group list, select the menu group whose items you want to make available for carryout service during the selected days of the week.
Carryout Override Menu & Hours: This area includes controls to make changes to availability of carryout service during specified dates and times, regardless of default carryout hours. This allows merchants to easily change their carryout availability, both on short notice due to special circumstances, and in advance for scheduled closures. For example, if a merchant will be closed on New Year’s Day, they can make the menu unavailable for that date in advance using the settings in the Carryout Override Menu & Hours area.
If you click Add a date, the program will display a calendar window, allowing you to select a single date. If you select a date, the program will then allow you to enable or disable carryout service on that date, regardless of default carryout settings. You can add multiple dates to an override set.
In the Start Time and End Time boxes, you can set the time range within each day that the items in the main group are available for carryout service in the Online Ordering webpage. When servers order items in this menu group, the webpage will only display controls for carryout service within the time range you set here. By setting a start time and end time, you set the time range during each selected day that the items in the menu groups are available for carryout service.
In the Upsell Group list, you can associate a main group with an appropriate upsell group. When a server orders items in the main group, the webpage will apply the rules set in the upsell group.
In the Menu Group list, select the menu group whose items you want to make available for carryout service during the selected days of the week.
Schedules: Delivery
The controls on this tab enables you to configure the availability of delivery service in the Online Ordering webpage.
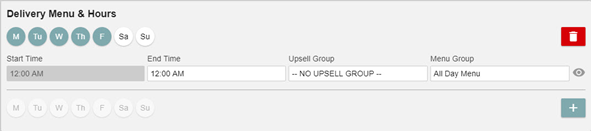
Delivery Menu & Hours: You can use the controls in this area to designate the days of the week and times of each day when the items of specific menu groups are available for carryout service in the Online Ordering webpage. If you click , the program will add one set of controls to the area. You can use these controls to set the availability time for one menu group. You can add multiple menu groups (with separate start and end times) to a single week, or you can add multiple weeks, each with different menu groups.

By selecting one or more of the day buttons, you can designate which days of the week the items in the menu groups are available for carryout service in the Online Ordering webpage.
In the Menu Group list, select the menu group whose items you want to make available for carryout service during the selected days of the week.
In the Upsell Group list, you can associate a main group with an appropriate upsell group. When a server orders items in the main group, the webpage will apply the rules set in the upsell group.
In the Start Time and End Time boxes, you can set the time range within each day that the items in the main group are available for delivery service in the Online Ordering webpage. When servers order items in this menu group, the webpage will only display controls for carryout service within the time range you set here. By setting a start time and end time, you set the time range during each selected day that the items in the menu groups are available for delivery service.
Delivery Override Menu & Hours: This area includes controls to make changes to availability of delivery service during specified dates and times, regardless of default delivery hours. This allows merchants to easily change their delivery availability, both on short notice due to special circumstances, and in advance for scheduled closures. For example, if a merchant will be closed on New Year’s Day, they can make the menu unavailable for that date in advance using the settings in the Delivery Override Menu & Hours area.
If you click Add a date, the program will display a calendar window, allowing you to select a single date. If you select a date, the program will then allow you to enable or disable delivery service on that date, regardless of default delivery settings. You can add multiple dates to an override set.
In the Start Time and End Time boxes, you can set the time range within each day that the items in the main group are available for delivery service in the Online Ordering webpage. When servers order items in this menu group, the webpage will only display controls for delivery service within the time range you set here. By setting a start time and end time, you set the time range during each selected day that the items in the menu groups are available for delivery service.
In the Upsell Group list, you can associate a main group with an appropriate upsell group. When a server orders items in the main group, the webpage will apply the rules set in the upsell group.
In the Menu Group list, select the menu group whose items you want to make available for delivery service during the selected days of the week.
Catering Tab
The Catering tab contains settings and controls needed to enable a Heartland Restaurant site to use the Catering service. The Catering service resembles the Online Ordering service, in that it allows a location to publish a website with features that enable customers to order items for catering service.
To enable Catering service for a location, log into the Admin Console and select the appropriate account. In the Main Menu, click Account Info. In the Account Info screen, select the Catering check box. Once you enable the Catering service, the program will make the Catering controls visible and active in the Online Ordering screen. To access these controls, click Location Setup in the Main Menu, then click Online Ordering. In the Online Ordering screen, click the Catering tab.
When you define a Catering website for a location, the Catering website’s URL resembles the URL subdomain of the Online Ordering website (configured on the General tab), supplemented with “-catering” text. For example, if the location’s URL subdomain is “locationname.hrpos.heartland.us”, then the Catering web address will be “locationname-catering.hrpos.heartland.us”.
General Settings
Future Days Allowed for Catering Orders: This box allows you to set the maximum number of days a future order is allowed to be placed from the current date. If you enter a number in the box, the Catering website will only accept future orders made for dates within the range of that number of days. For instance, if you enter “10”, the customer placing the order will only be able to select a date within ten days of the current day.
Catering Cut Off Time: In this box, enter the latest time during the day that a customer can place a catering order and receive it on the next day.
Ticket Prefix: In this box, you can designate a prefix for all catering tickets created in the website so they can be easily identified. You can set a prefix up to four characters long, such as “WEB” and “OLO”.
Disable Future Ordering: If you select this check box, the Catering website will not display controls for selecting a future date or time. When customers create new orders through Catering, the website will automatically assign new orders to the next available time. This setting supersedes the setting of the Future Days Allowed for Catering Orders box.
Carryout Settings
This area includes controls that enable you to configure the Catering website to provide catering carryout service.
Allow Carryout: If you select this check box, the Catering website will display and enable controls that customers can use to order items for carryout service.
Carryout Room: Tis list enables you to associate the orders and sales from carryout orders to a specific room.
Carryout Payment Types: This list enables you to specify what type of payments are acceptable for carryout orders.
- If you select Credit Card, the website will include only controls that allow customers to pay with a credit card before submitting the order. It will not include any other payment options.
- If you select In-Person, the webpage will allow customers to submit the order without payment, and to pay for the order, in person, upon pickup.
- If you select Both, the webpage will allow customers to either pay with credit cards when submitting an order, or wait and pay for the order, in person, upon pickup.
Carryout Minimum: In this box, you can enter a required minimum dollar amount for carryout orders. If you enter an amount in this box, the website will only allow a customer to submit an order for carryout service if the check’s total is equal or greater than this amount.
Carryout Maximum: In this box, you can enter an enforced maximum dollar amount for carryout orders. If you enter an amount in this box, the website will only allow a customer to submit an order for carryout service if the check’s total is equal or less than this amount.
Carryout Tips Allowed: If you select this check box, the website will display controls that enables customers to add a tip amount to an order in the website before submitting the order.
Print Checks Immediately on Received Orders: If you select this check box in the Carryout area, the POS will print checks for carryout orders immediately upon receiving them from the Online Ordering site.
Order Completion Message: These boxes enable you to add a customized text message that will display when customers complete an order in the Online Ordering website. Using these controls, you can create a closing message for carryout catering orders.
In the Title box, type a title for the message. In the Message box, type the text of the full message. In the Online Ordering website, when a customer submits an order, the website will display your custom title and message in the order confirmation screen. It will also include the custom title and message in the customer’s order confirmation email.
Delivery Settings
This area includes controls that enable you to configure the Catering website to provide catering delivery service.
Allow Delivery: If you select this check box, the Catering website will display and enable controls that customers can use to order items for delivery service.
Delivery Room: This list enables you to associate the orders and sales from delivery orders to a specific room.
Delivery Payment Types: This list enables you to specify what type of payments are acceptable for delivery orders.
- If you select Credit Card, the website will include only controls that allow customers to pay with a credit card before submitting the order. It will not include any other payment options.
- If you select In-Person, the website not provide an option for credit card payment, and the customer will pay for the order in person when the driver delivers it.
- If you select Both, the website will include options to pay either with a credit card or in person.
Delivery Minimum: In this box, you can enter a required minimum dollar amount for carryout orders. If you enter an amount in this box, the website will only allow a customer to submit an order for carryout service if the check’s total is equal or greater than this amount.
Delivery Maximum: In this box, you can enter an enforced maximum dollar amount for carryout orders. If you enter an amount in this box, the website will only allow a customer to submit an order for carryout service if the check’s total is equal or less than this amount.
Delivery Tips Allowed: If you select this check box, the website will display controls that enables customers to add a tip amount to an order in the website before submitting the order.
Print Checks Immediately on Received Orders: If you select this check box in the Delivery area, the POS will print checks for delivery orders immediately upon receiving them from the Online Ordering site.
Order Completion Message: These boxes enable you to add a customized text message that will display when customers complete an order in the Online Ordering website. Using these controls, you can create a closing message for catering delivery orders.
In the Title box, type a title for the message. In the Message box, type the text of the full message. In the Online Ordering website, when a customer submits an order, the website will display your custom title and message in the order confirmation screen. It will also include the custom title and message in the customer’s order confirmation email.
Delivery Area
This area includes controls that enable you to define the area surrounding the site where delivery service is available. The area includes a panel that displays a map (provided by Google Maps) of the area around the site’s address.
- If you click New Polygon, the program will add a rectangular polygon inside the maps panel. You can then click and drag the polygon to the appropriate area within the map, and click and drag the nodes on the edges of the polygon to modify its shape, until it covers the site’s total delivery area.
- If you click New Polygon again, the program will add another (differently colored) polygon to the map, which you can then move and modify as needed. By adding multiple polygons to the map, you can define delivery areas with different delivery fees.
- If you click Reset Polygons, the program will reset the map to its original state. It will remove all but one polygon, and the remaining polygon will have its original default size and location.
For each polygon that you add to the map, the program will display a Delivery Fee list with a label corresponding to the color of its polygon (such as Blue Zone Delivery Fee). In each Delivery Fee list, you can select a delivery fee. (You can define delivery fees in the Adjustments window.) Later, when a customer in this delivery zone places an order, the website will apply this delivery fee to the check.
Below each Delivery Fee list, the program displays a corresponding DELETE button (such as DELETE BLUE POLYGON). If you click one of these buttons, the program will remove the polygon from the map.
Schedules: Carryout
The controls on this tab enables you to configure the availability of carryout service in the Catering website.
Carryout Menu & Hours: You can use the controls in this area to designate the days of the week and times of each day when the items of specific menu groups are available for carryout service in the Catering website. If you click , the program will add one set of controls to the area. You can use these controls to set the availability time for one menu group. You can add multiple menu groups (with separate start and end times) to a single week, or you can add multiple weeks, each with different menu groups.
By selecting one or more of the day buttons, you can designate which days of the week the items in the menu groups are available for carryout service in the Catering website.
In the Start Time and End Time boxes, you can set the time range within each day that the items in the main group are available for carryout service in the Catering website. When servers order items in this menu group, the website will only display controls for carryout service within the time range you set here. By setting a start time and end time, you set the time range during each selected day that the items in the menu groups are available for carryout service.
In the Upsell Group list, you can associate a main group with an appropriate upsell group. When a server orders items in the main group, the website will apply the rules set in the upsell group.
In the Menu Group list, select the menu group whose items you want to make available for carryout service during the selected days of the week.
Carryout Override Menu & Hours: This area includes controls to make changes to availability of carryout service during specified dates and times, regardless of default carryout hours. This allows merchants to easily change their carryout availability, both on short notice due to special circumstances, and in advance for scheduled closures. For example, if a merchant will be closed on New Year’s Day, they can make the menu unavailable for that date in advance using the settings in the Carryout Override Menu & Hours area.
If you click Add a date, the program will display a calendar window, allowing you to select a single date. If you select a date, the program will make carryout service on that date, even if it falls on a day of the week when carryout service is usually not available. You can add multiple dates to an override set.
In the Start Time and End Time boxes, you can set the time range within each day that the items in the main group are available for carryout service in the Catering website. When servers order items in this menu group, the website will only display controls for carryout service within the time range you set here. By setting a start time and end time, you set the time range during each selected day that the items in the menu groups are available for carryout service.
In the Upsell Group list, you can associate a main group with an appropriate upsell group. When a server orders items in the main group, the website will apply the rules set in the upsell group.
In the Menu Group list, select the menu group whose items you want to make available for carryout service during the selected days of the week.
Schedules: Delivery
The controls on this tab enables you to configure the availability of delivery service in the Catering app.
Delivery Menu & Hours: You can use the controls in this area to designate the days of the week and times of each day when the items of specific menu groups are available for carryout service in the Catering website. If you click , the program will add one set of controls to the area. You can use these controls to set the availability time for one menu group. You can add multiple menu groups (with separate start and end times) to a single week, or you can add multiple weeks, each with different menu groups.
By selecting one or more of the day buttons, you can designate which days of the week the items in the menu groups are available for carryout service in the Catering website.
In the Menu Group list, select the menu group whose items you want to make available for carryout service during the selected days of the week.
In the Upsell Group list, you can associate a main group with an appropriate upsell group. When a server orders items in the main group, the website will apply the rules set in the upsell group.
In the Start Time and End Time boxes, you can set the time range within each day that the items in the main group are available for delivery service in the Catering website. When servers order items in this menu group, the website will only display controls for carryout service within the time range you set here. By setting a start time and end time, you set the time range during each selected day that the items in the menu groups are available for delivery service.
Delivery Override Menu & Hours: This area includes controls to make changes to availability of delivery service during specified dates and times, regardless of default delivery hours. This allows merchants to easily change their delivery availability, both on short notice due to special circumstances, and in advance for scheduled closures. For example, if a merchant will be closed on New Year’s Day, they can make the menu unavailable for that date in advance using the settings in the Delivery Override Menu & Hours area.
If you click Add a date, the program will display a calendar window, allowing you to select a single date. If you select a date, the program will make delivery service on that date, even if it falls on a day of the week when delivery service is usually not available. You can add multiple dates to an override set.
In the Start Time and End Time boxes, you can set the time range within each day that the items in the main group are available for delivery service in the Catering website. When servers order items in this menu group, the website will only display controls for delivery service within the time range you set here. By setting a start time and end time, you set the time range during each selected day that the items in the menu groups are available for delivery service.
In the Upsell Group list, you can associate a main group with an appropriate upsell group. When a server orders items in the main group, the website will apply the rules set in the upsell group.
In the Menu Group list, select the menu group whose items you want to make available for delivery service during the selected days of the week.
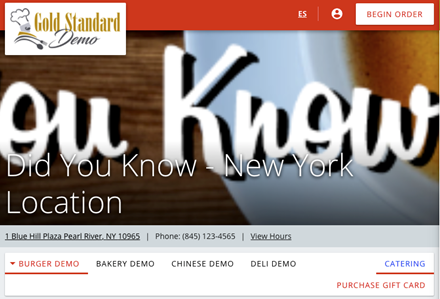
How to Place an Online Order
- Navigate to the restaurant’s online order website.
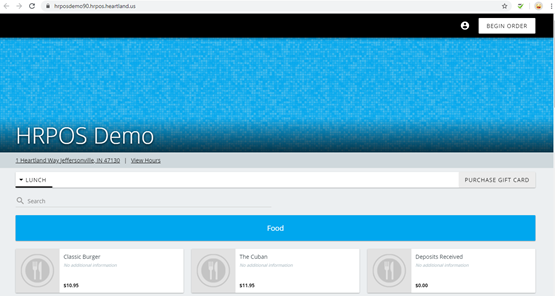
- Select an item that you want to add to your check. When you select an item, the program prompts you to select Carryout or Delivery. You can configure a site to offer either carryout service, delivery service, or both.
- Select Carryout or Delivery.
- After selecting Carryout or Delivery, select As Soon As Possible or Scheduled Date and Time. The Scheduled Date and Time option is only available if you set the restaurant to use future orders.
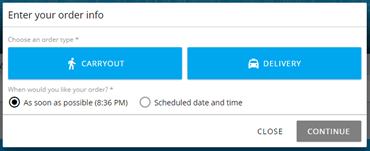
- If you selected Carryout in Step 3, then select Continue.
or If you selected Delivery in Step 3, enter the necessary delivery information in the Address, Unit/Suite, and Delivery Instructions boxes, then click Continue.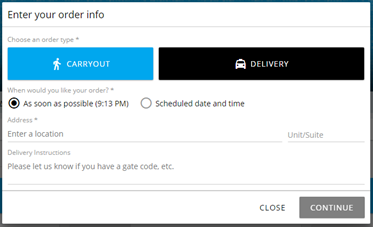
- Enter the following options when prompted:
Quantity: To order more than one of the selected item, enter a different quantity.
Who Is This Item For: If you are ordering items for multiple persons, enter the name of the person who will receive this item.
Ingredients: If they are needed, select appropriate ingredients. Not all Items will have ingredients, but if they are required, the program will display them on the right-hand side.
Special Instructions: If the order requires special instructions, enter them here.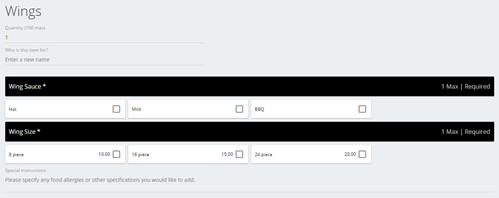
- After completing all required selections for the Item, select Add to Order.

- Continue adding items to the order until it is complete.
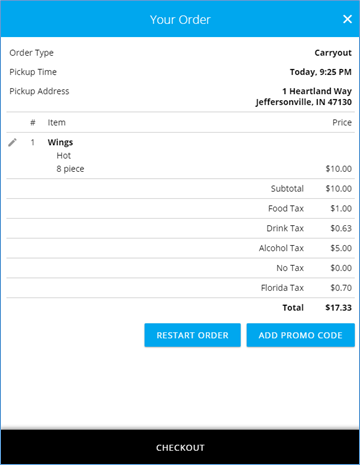
- Once the order is complete, select the Shopping Cart in the top right-hand corner.

- Review the order and select Checkout.
- In the Enter Your Info panel, enter the following contact information for the order:
Name: Enter the customer’s name. (Required.)
Email: Enter the customer’s email address. The program will send the receipt to this address. (Required.)
Phone: Enter the customer’s phone number. (Required.) - Select how you want to pay for the order. The available payments depend on the site’s settings.
In Person: Pay staff in person upon pickup or delivery.
New Credit Card: Pay online with a credit card.
New Gift Card: Pay online with a gift card.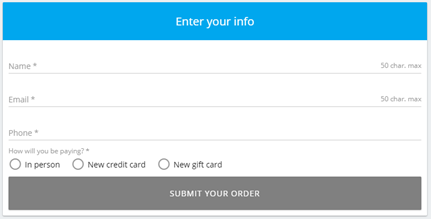
- If you select New Credit Card, the program will prompt you to enter the following card information:
Card Number
Expiration Date
CVV
Postal Code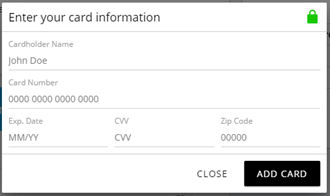
- After entering the card Information, select Add Card.
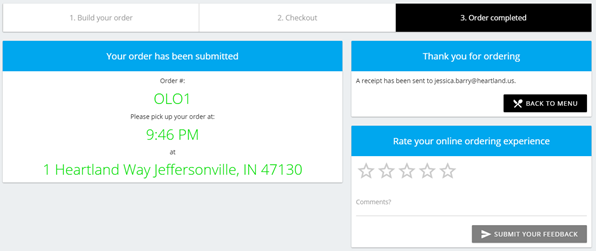
- Select Submit Order. In the Ready to Submit screen, select Submit.
- Select Cancel to cancel the order or add more items.
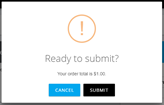
The program will display the Order Confirmation screen.