Overview
This article describes how to configure a Heartland Restaurant network to use the PAX S920 device to process payments with the Pay at the Table service. This service is only supported by Heartland Payment processing. To function properly, the device must be loaded with a Special PAX Store template for Heartland Restaurant. If you attempt to set up a PAX S920 to perform Pay at the Table with any other processor, it will not install successfully.
We recommend you make any adjustments to the device at the PAXStore level to ensure that, if the device’s firmware is ever updated or changed, those updates will include the site-specific settings. If you do not set them at the PAXStore level, your settings will be overwritten by any downloads.
Prerequisites: You must add a S920 SKU to an opportunity in Salesforce. The Merchant Account must have a Heartland Processing MID in Salesforce to complete order, and the merchant must be processing with Heartland Payments Systems.
If you have any questions or concerns regarding the PAX S920 device, please email them to paxsupport@e-hps.com, or call 1.888.909.8498.
Heartland Restaurant Account Number
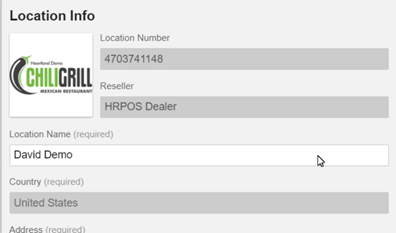
To set up a PAX S920 device to perform Pay at the Table service, you must enter the Heartland Restaurant Location number as the account number in the PAXStore. The HPOS Order Fulfillment team will add the HR Location ID into the PAXStore Account Template box before shipping the device to assist its setup and configuration. If the Server Page is not already set in the template, follow the instructions below to add the Location/Account number manually or contact PAX to have it added to the PAXStore template.
- Log into the Heartland Restaurant Admin Console. ( hrpos.heartland.us ).
- In the Main Menu, click Resellers, then click the appropriate dealer.

- In the Main Menu, click Accounts, and click the appropriate account.
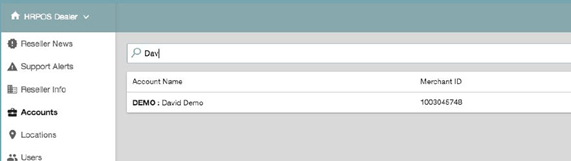
- In the Main Menu, click Locations, then select the store that you are configuring to use the S920 device.
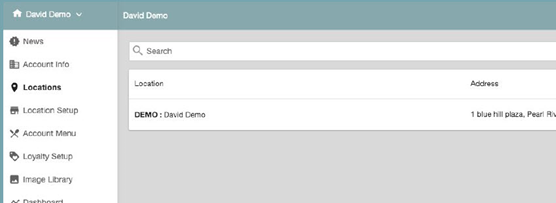
- Find and record the Location Number.
Setting the Location/Account Parameters
The following procedures describe how to set the necessary location and parameters in the PAX device. While this process is available, we recommend you set these parameters in the template (in the PAXStore).
- Power the device on.
- Press and hold the (green circular) Enter button and the 1 button simultaneously for five to seven seconds.
- Enter the default password (916860) and press the (green circular) Enter.
The device will display the PAX Menu. - Press the down arrow on screen and select System Settings.
- Press the down arrow twice and select Pay At The Table.
- Select Server Page.
- Enter the account number for Heartland Restaurant (PAX/PATT/<Enter HR Location number>).
- Press the (green circular) Enter.
- Tap the Go Back arrow three times to save and exit.
Setting the WiFi Connection in the PAX S920 Terminal
You also need to set the S920 device to connect to the site’s wireless network.
- Power the device on.
- Press and hold the (green circular) Enter button and the 1 button simultaneously for five to seven seconds.
- Enter the default password (916860) and press the (green circular) Enter.
The device will display the PAX Menu. - Tap the down arrow, then select Communication.
- Enter the password again.
- Tap the down arrow once.
- Tap Wifi Parameters.
- Tap SSID, enter the name of the site’s wireless network, then tap the (green circular) Enter button.
- Tap Password, enter the password for the site’s wireless network, then tap the (green circular) Enter button.
- Tap on the go back arrow on the screen 3 times.
- Verify that the device connects to the wireless network.
The WiFi icon will turn from gray to blue bars. - Repeat Steps 2 - 7.
- Tap DHCP Type, then tap 2. Static.
- Tap the down arrow.
- Tap IP Address.
- Record the IP address that displays.
Configuring Heartland Restaurant
The following procedures describe how to configure Heartland Restaurant to use the PAX S920 device.
Creating a Payment Terminal
- Log into the Admin Console (hrpos.heartland.us).
- In the Main Menu, click Account, then click the appropriate account.
- In the Main Menu, click Location, then click the appropriate location.
- In the Main Menu, click Location Setup, then click Payment Terminals.
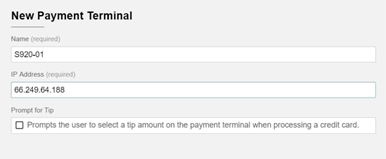
- In the Payment Terminals screen, click the NEW button to add a Payment Terminal.
- In the Name box, type a descriptive name for the device.
- In the IP Address box, type the IP address of the PAX S920 device.
- If necessary, select the Prompt for Tip check box.
- Click
 to save the record.
 - Click
 to publish changes, then click Yes at the prompt.
Connecting the POS to a PAX S920 Payment Terminal
These settings allow you to attach a PAX S920 to a Heartland Restaurant terminal for normal use.
- Open and log into the Heartland Restaurant POS.
- Tap User Menu.
- Tap Manager.
- Tap Payment Terminals.
- Select the PAX S920 device.
When the POS connects to the device, it displays a message (“Connected”).
Using the S920
The following procedures describe how to perform various payment, void, and refund transactions on the S920 device.
Credit Card with No EMV Chip
- In the POS, send an open ticket with items.
- On the S920 device, tap LOGIN and enter a valid password, then press the Enter button.
- Select the ticket (by table name) to be paid.
- Review the ticket details and tap FUNC.
- Tap Pay.
- Tap the payment method CREDIT.
- Select a tip amount (if applicable).
- Swipe the card to finish the transaction.
- If the device prompts for a signature, sign on the device’s screen, then tap Accept.
The ticket is now fully paid. Return to the POS to close the ticket.
Insert Credit Card with EMV Chip
- In the POS, send an open ticket with items.
- On the S920 device, tap LOGIN and enter a valid password, then press the Enter button.
- Select the ticket (by table name) to be paid.
- Review the ticket details and tap FUNC.
- Tap Pay.
- Tap the payment method CREDIT.
- Select a tip amount (if applicable).
- Insert the card (chip-side up).
- After approval, remove the card.
- If the device prompts for a signature, sign on the device’s screen, then tap Accept.
The ticket is now fully paid. Return to the POS to close the ticket.
Insert Credit Card with EMV Chip and PIN Request
- In the POS, send an open ticket with items.
- On the S920 device, tap LOGIN and enter a valid password, then press the Enter button.
- Select the ticket (by table name) to be paid.
- Review the ticket details and tap FUNC.
- Tap Pay.
- Tap the payment method CREDIT.
- Insert the card (chip-side up).
- When prompted, enter the PIN.
- After approval, remove the card.
- If the device prompts for a signature, sign on the device’s screen, then tap Accept.
The ticket is now fully paid. Return to the POS to close the ticket.
Contactless Credit Card with EMV Chip
- In the POS, send an open ticket with items.
- On the S920 device, tap LOGIN and enter a valid password, then press the Enter button.
- Select the ticket (by table name) to be paid.
- Review the ticket details and tap FUNC.
- Tap Pay.
- Tap the payment method CREDIT.
- Select a tip amount (if applicable).
- Tap the contactless card on the screen of the device to trigger the transaction.
- If the device prompts for a signature, sign on the device’s screen, then tap Accept.
The ticket is now fully paid. Return to the POS to close the ticket.
Credit Card Manual Entry
- In the POS, send an open ticket with items.
- On the device, tap LOGIN and enter a valid password, then press the Enter button.
- Select the ticket (by table name) to be paid.
- Review the ticket details and tap FUNC.
- Tap Pay.
- Tap the payment method CREDIT.
- When prompted to swipe or insert the card, type the card number, then tap ENTER.
- If the device prompts for a signature, sign on the device’s screen, then tap Accept.
The ticket is now fully paid. Return to the POS to close the ticket.