Overview
This article describes how to configure a Heartland Restaurant network to use the QSR kitchen display system.
As of version 5.45, our integration with QSR does not support the following features:
- Show Whole Ingredients on Both Halves
- Multiple Modifier Overrides
They are being investigated, and may be supported in later versions.
Retrieve the IP Address and Port Settings from the QSR Server
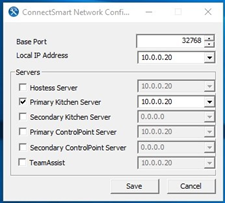
To configure Heartland Restaurant to use the QSR server, you must have the IP address and port number settings for the QSR server. You can retrieve those with the ConnectSmart Network Configuration utility, which should have been installed with the other QSR software.
- On the QSR Server computer, run the ConnectSmart Network Configuration utility.
- Record the port number displayed in the Base Port
- Record IP address displayed in the Primary Kitchen Server
- If the site uses a secondary kitchen server, also record the IP address in the Secondary Kitchen Server box.
Configuring Heartland Restaurant
The following procedures describe how to configure Heartland Restaurant to use the QSR system. Before enabling the QSR integrations, close ALL open tickets.
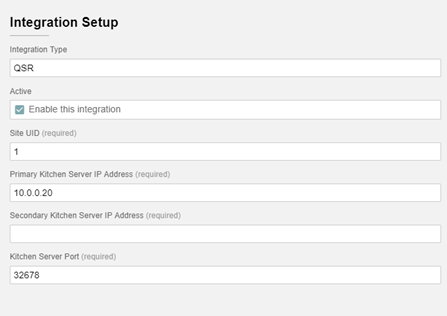
- Log into the Admin Portal and select an appropriate account.
- In the Main Menu, select Integrations.
- In the Integrations window click New.
- In the Integration Type list, select QSR.
- Select the Active check box.
- In the Site UID box, type “1”.
- In the Primary Kitchen Server IP Address box, type the IP address of the device running the QSR program.
- If you have a second device running the QSR program, enter its IP address in the Secondary Kitchen Server IP Address
- In the Kitchen Server Port Number box, enter the port number that Heartland Restaurant should use to communicate with the QSR program. (The default is “32768”).
- Click
 to save your settings, then click
 to publish the settings.
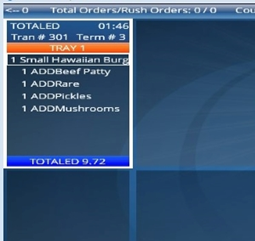
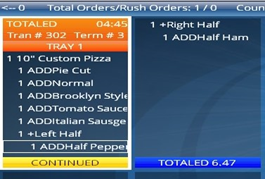
Heartland Restaurant is now configured to communicate with the QSR server. When the QSR server is enabled and configured, the QSR terminals will display order information when servers send orders in the POS.
Information for QSR Setup
To configure the QSR software, you will need certain information from Heartland Restaurant. The following lists the information you will need, and how they are labeled in the QSR and Heartland Restaurant software.
Check Values
QSR Label | Heartland Restaurant Label |
Check Number | Ticket Number |
Pickup Time | Hold Date |
Scheduled Pickup Time | Promised Date |
Course Values
QSR Label | Heartland Restaurant Label |
Destination ID | Room ID |
Terminal | Device Name, Device ID |
Customer Name | Guest Name |
Comment | Comment |
Guest Count | Guest Count |
Server Name | Server Name |
Server ID | Server ID |
Table Name | Table Name |
Table Section | Table Section |
Item Values
QSR Label | Heartland Restaurant Label |
Item ID | Item ID |
Description | Name |
Department | Display Group ID |
Category | Category ID |
Seat | Seat |
Unit Price | Base Price |
Item Trait | Normal Item, Add Item, Cut Item |
Alternate Description | Short Name |
Destination ID | Room ID |
Guest Values
QSR Label | Heartland Restaurant Label |
First Name | First Name |
Last Name | Last Name |
Notes | Delivery Instructions |
Phone Number | Phone |
Address | Address, Suite, City, ZIP Code |
Notification Type | SMS |
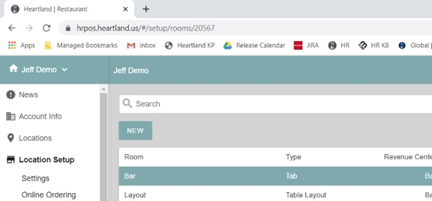
Retrieving the Room ID Number
The following procedures describe how to retrieve the necessary room ID numbers.
- Log into the Admin Console and select the account.
- In the Main Menu, click Location Setup, then click Rooms.
- In the Rooms screen, select a room that you want to associate with a QSR display.
- In the web browser’s URL box, copy the five-digit number at the end of the URL.
This is the Room ID number of the selected room.
Retrieving the Item ID Number
The following procedures describe how to retrieve the necessary item ID numbers.
- Log into the Admin Console and select the account.
- In the Main Menu, click Account Menu, then click Items.
- In the Items screen, select an appropriate item.
- In the web browser’s URL box, copy the six-digit number at the end of the URL.
This is the Item ID number of the selected room.
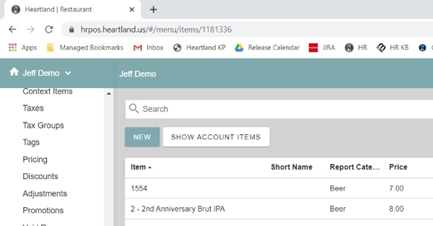
Add Short Names to Menu Items
By default, when displaying an item, the QSR uses a menu item’s full name as set in the item’s settings. For some items (such as partial toppings), this may be undesirable.
For such items, you can set the QSR to display a name other than the item’s full name.
- In the Admin Console’s Main Menu, click Account Menu, then click Items.
- In the Items screen, select an item.
- In the item’s settings panel, type a name in the Short Name.

Instead of displaying the item as “Half Pepperoni”, the QSR will now display the item as “Pepperoni”.