Set up and use the Uber Eats integration
Overview
This guide explains how to connect your restaurant to Uber Eats using the Genius for Restaurants Admin Portal, and how to manage daily operations from your POS.
Setting up the Uber Eats integration
Setting up your Uber Eats integration allows your menu, orders, and store availability to sync automatically between Genius for Restaurants and Uber Eats.
Before You Begin
Verify that your location data is fully synchronized.
Log into the Admin Portal and access the appropriate account and location.
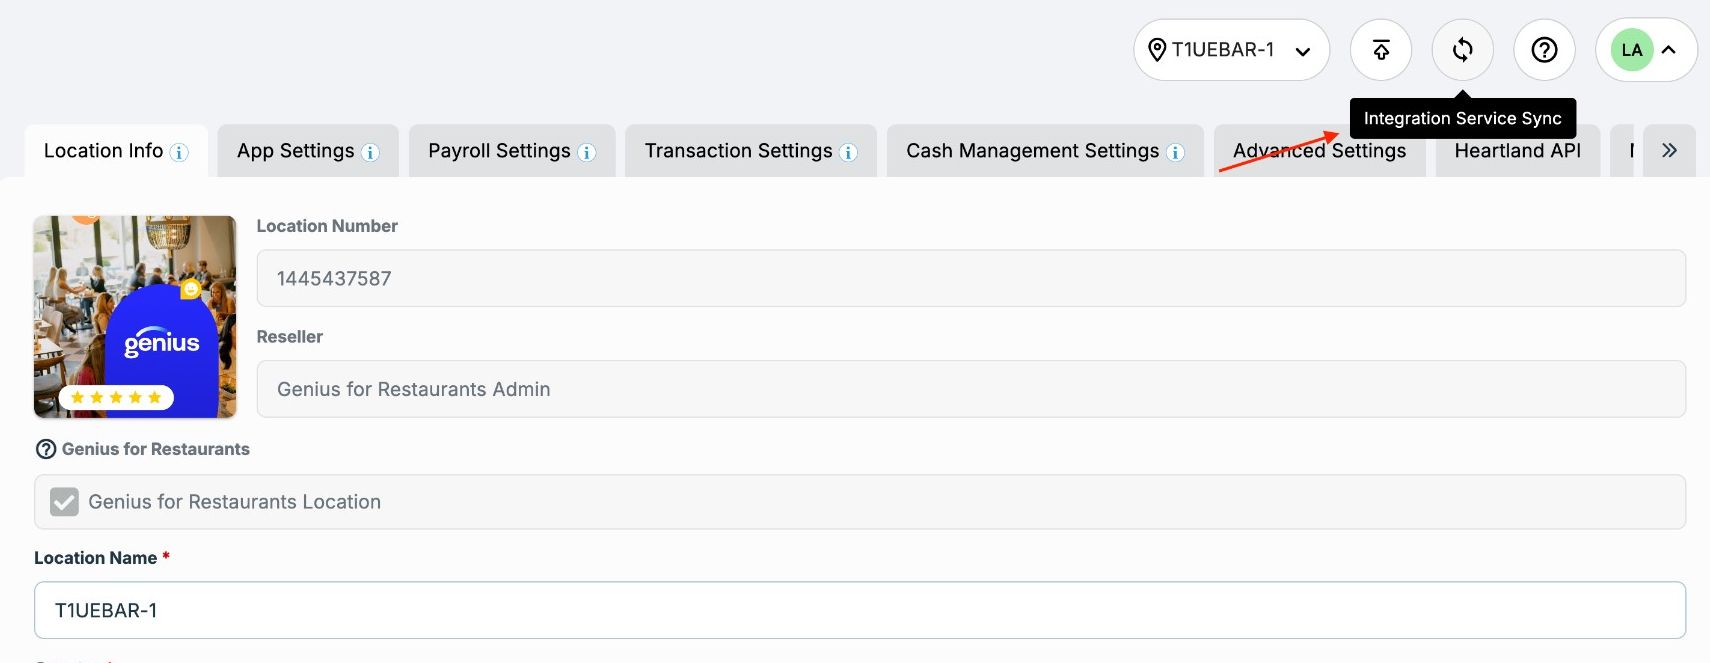
In the Location Settings screen, click the Integration Service Sync button.
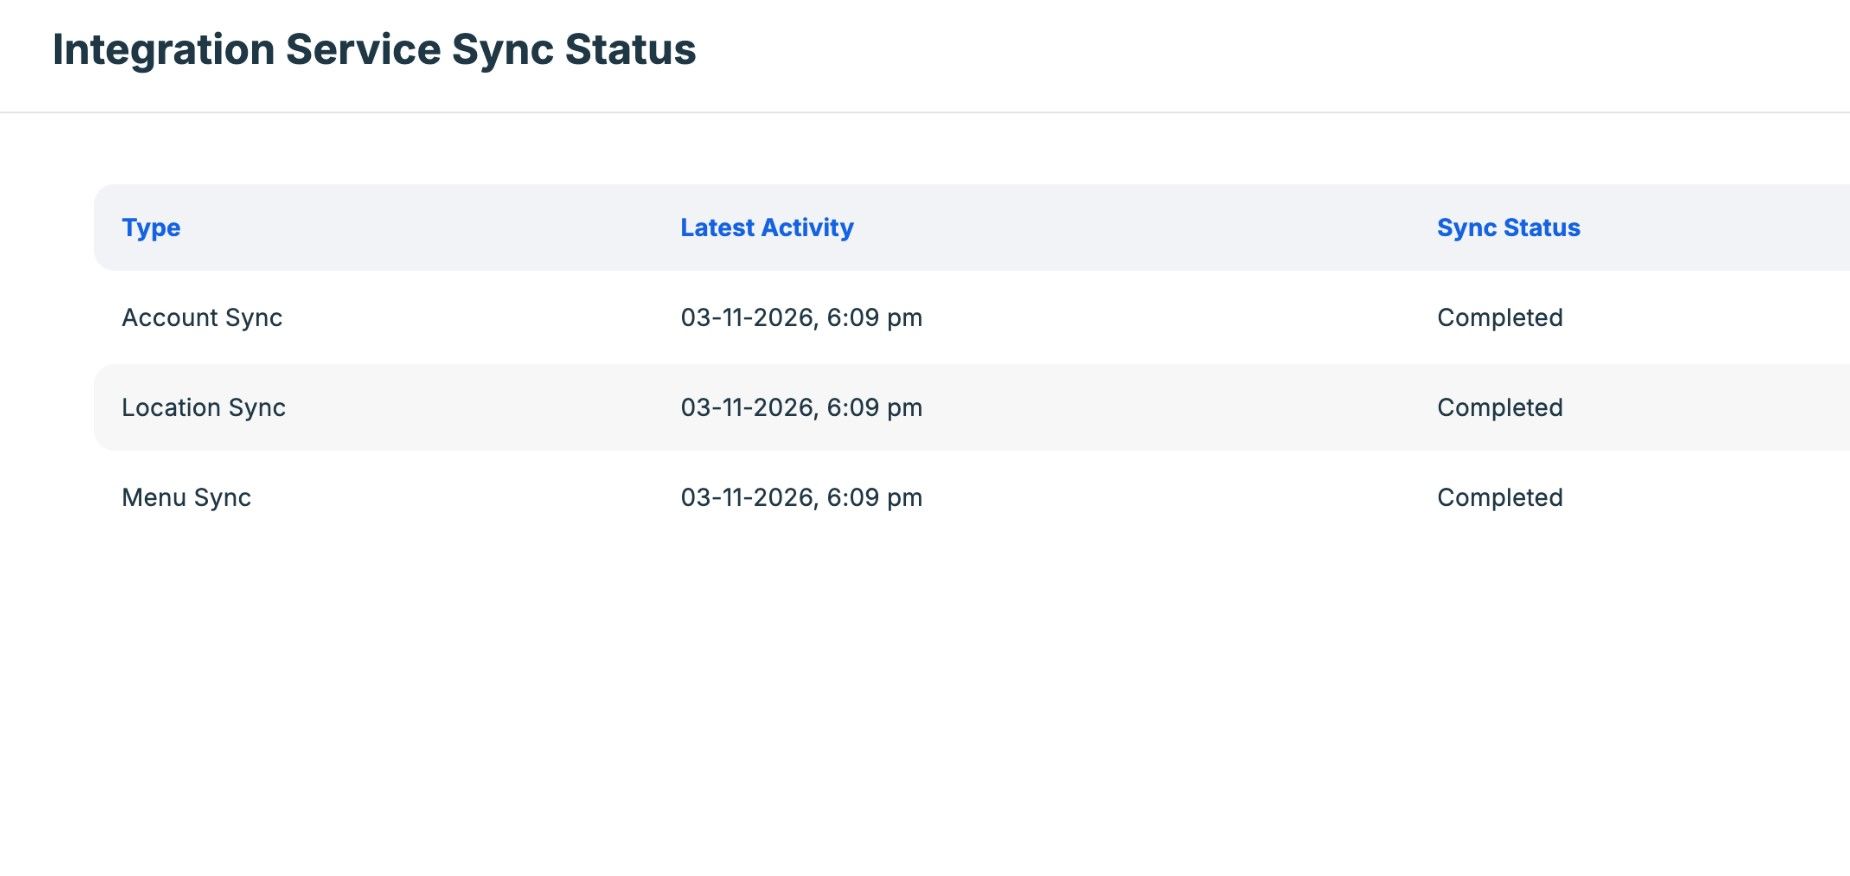
Verify that the Location, Account, and Menu statuses display as Completed.
If anything is incomplete, click Publish to update your data.
Configure third-party ordering: menu & hours
- In the Admin Portal’s Main Menu, click Location, then click Online Ordering.
- In the Online Ordering screen, click the Online Ordering tab.
- Click the Third Party Ordering subtab.
- In the Third Party Ordering Menu and Hours area, configure the location’s Uber Eats menu
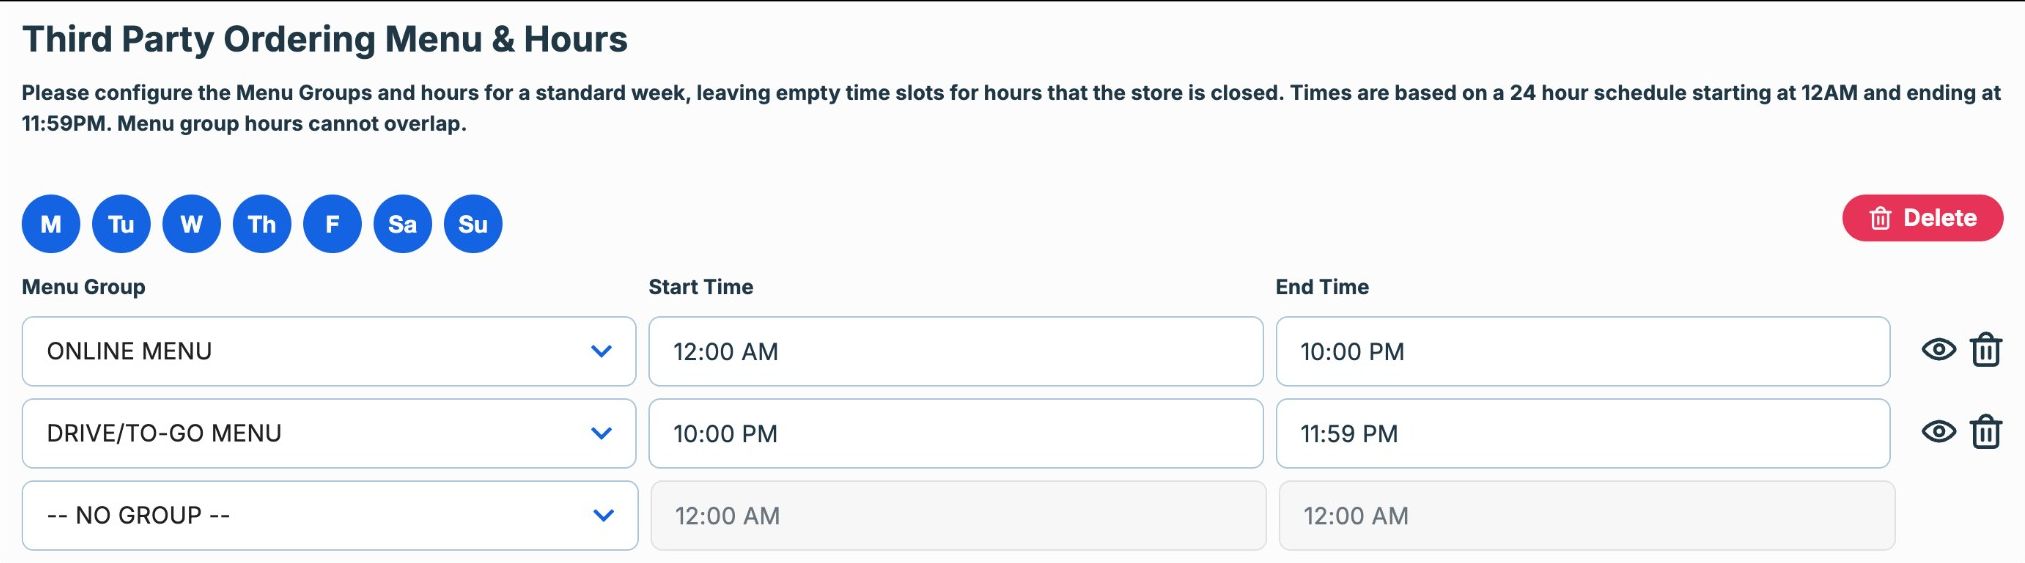
Note: For any given menu group, the difference between Start Time and End Time must be equal to or greater than 60 minutes.
Activate Uber Eats Integration
After configuring the menu, you can enable the Uber Eats integration.
- In the Admin Portal Main Menu, click Integrations.
- In the Integrations screen, click New.
- In the Integration Type list, select Uber Eats.
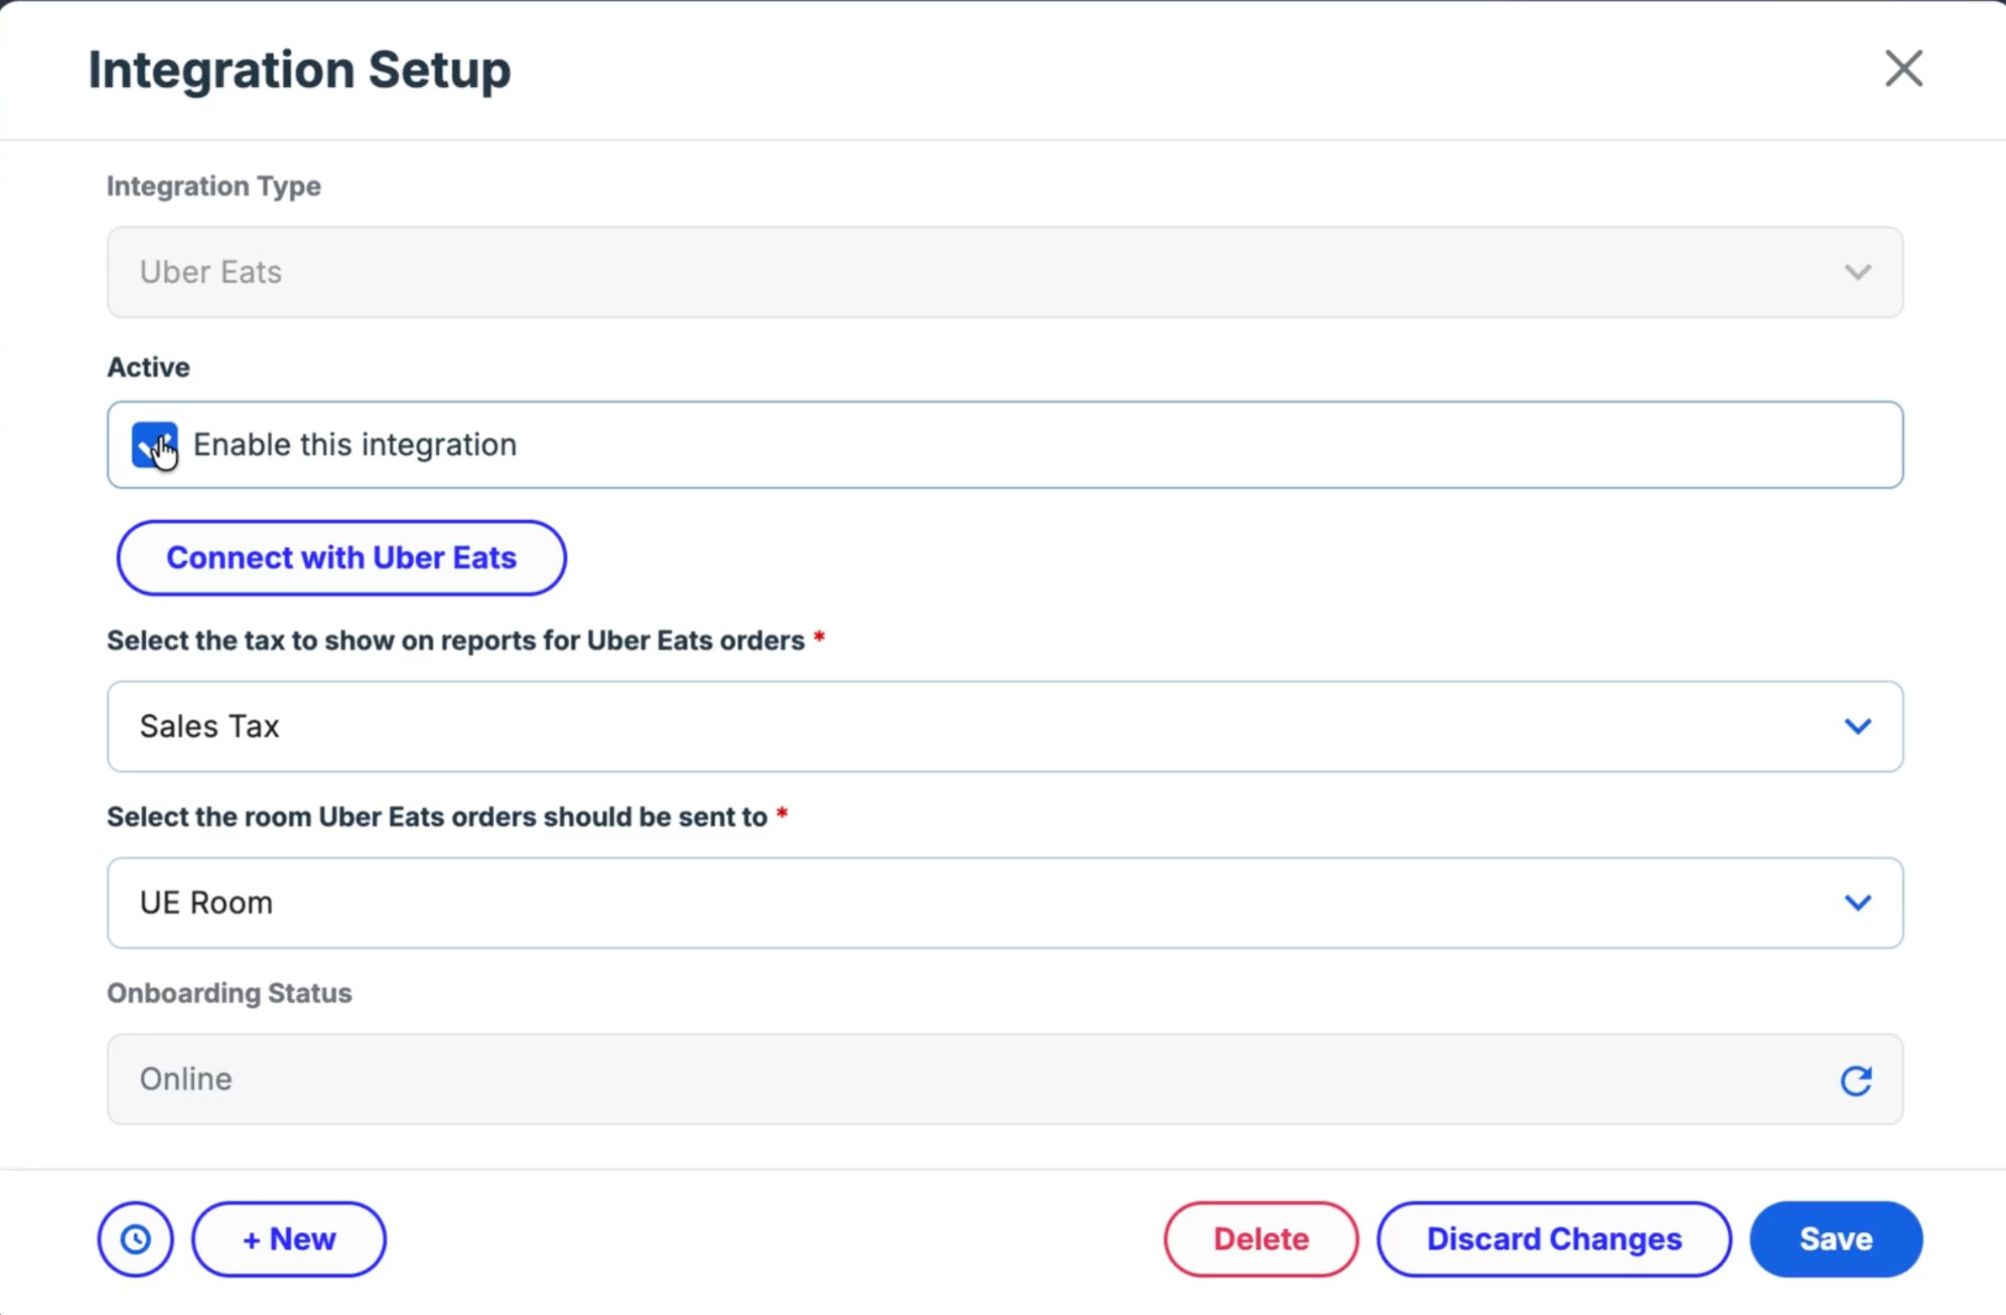
- In the Tax list, select the tax that you want to appear in Uber Eats reports.
- In the Room list, select the room where incoming Uber Eats orders should be sent.
- Click Save.
The program will display the integration’s status as Pending Connection and enable the Connect to Uber Eats button.
The program will display the current status of the Uber Eats integration in the Status box. Available statuses include:
Pending Connection
Active
Not Active
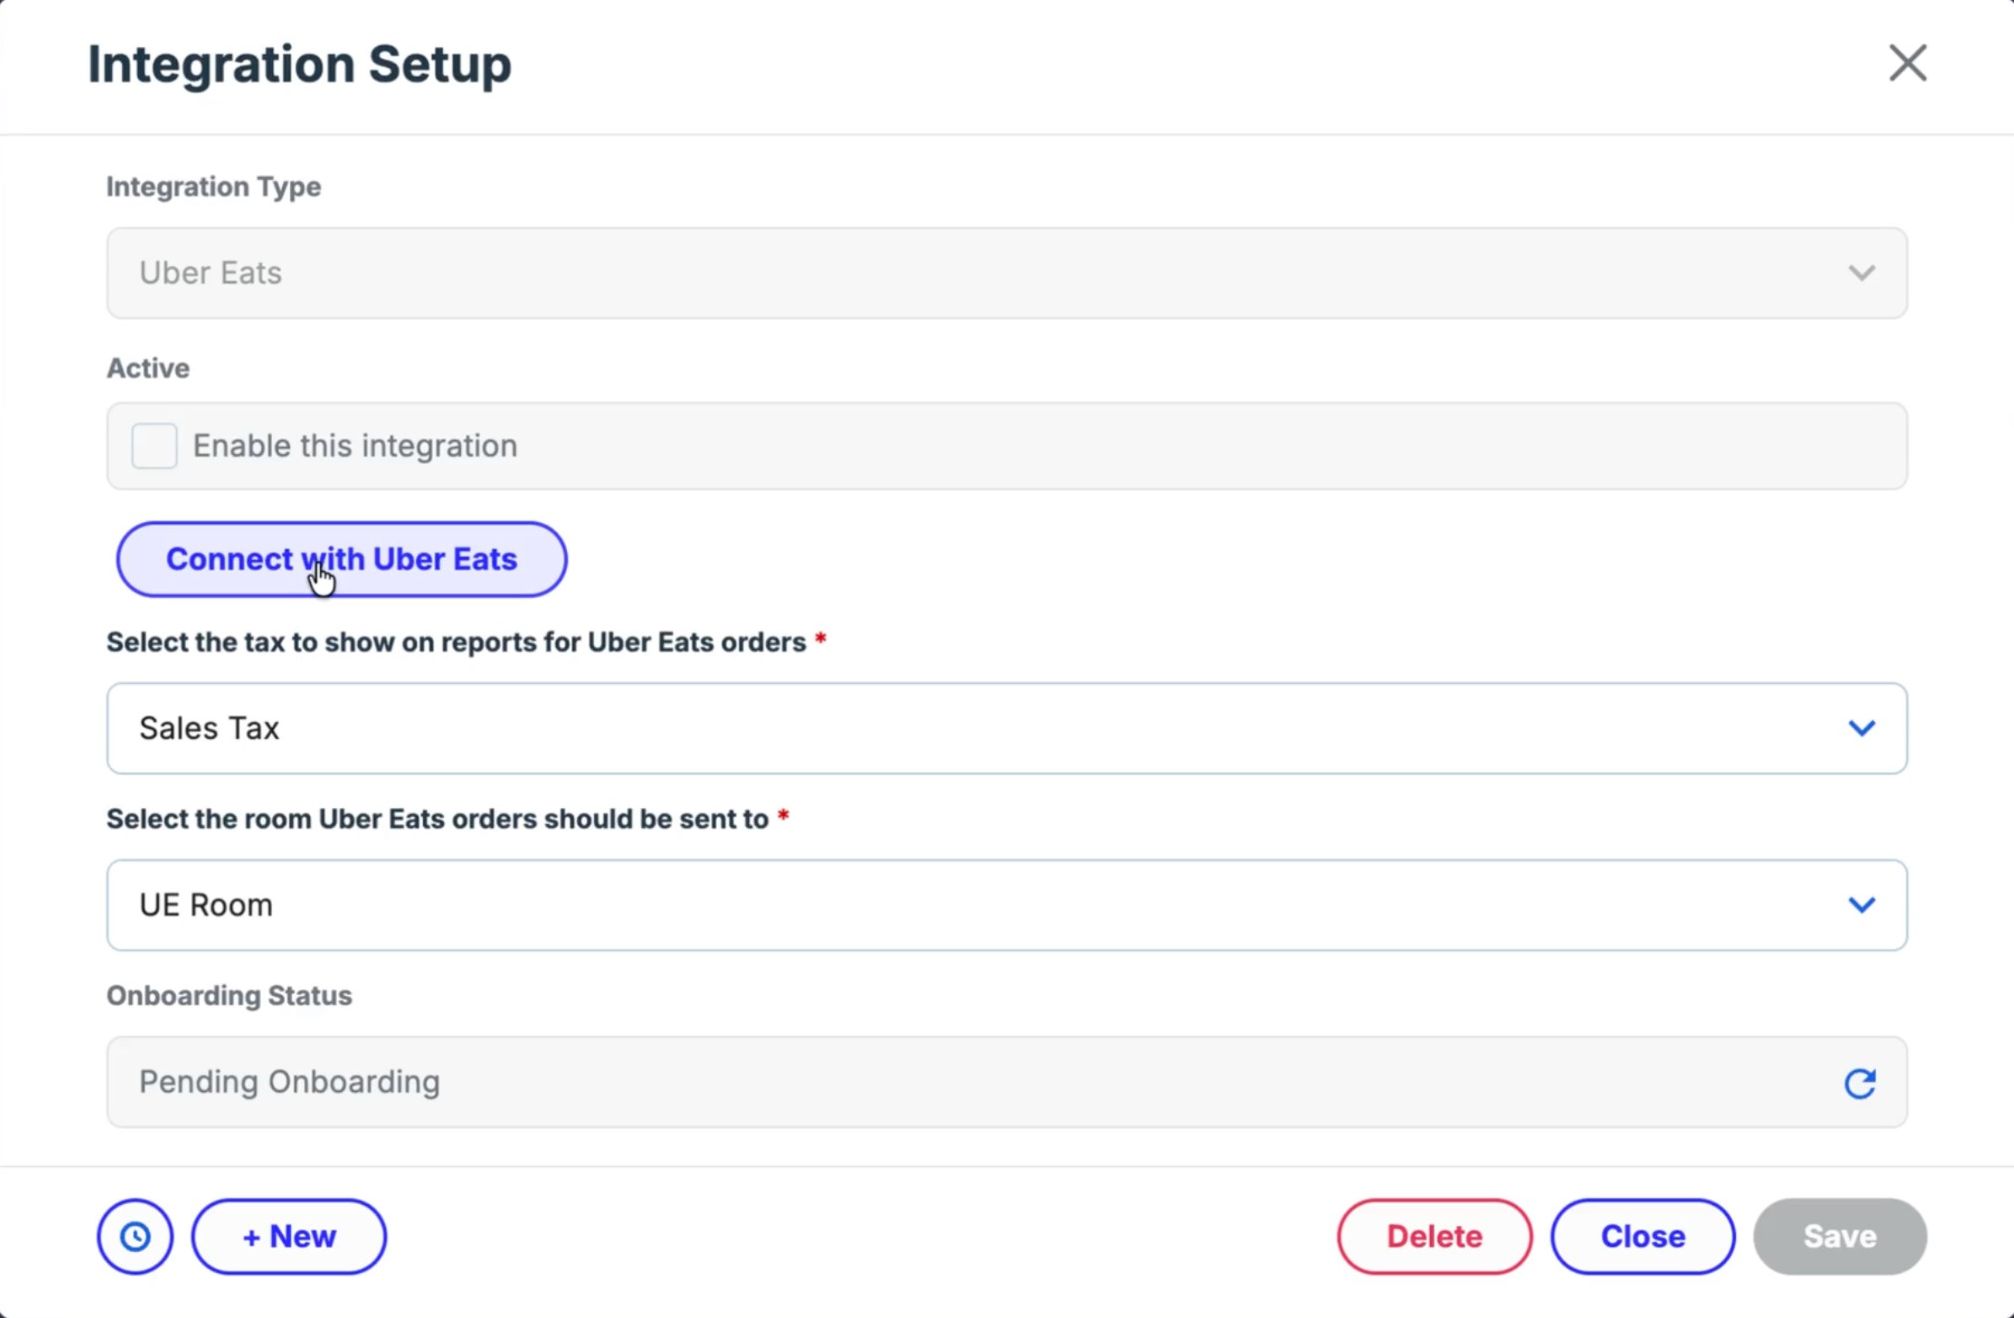
- Click Connect to Uber Eats.
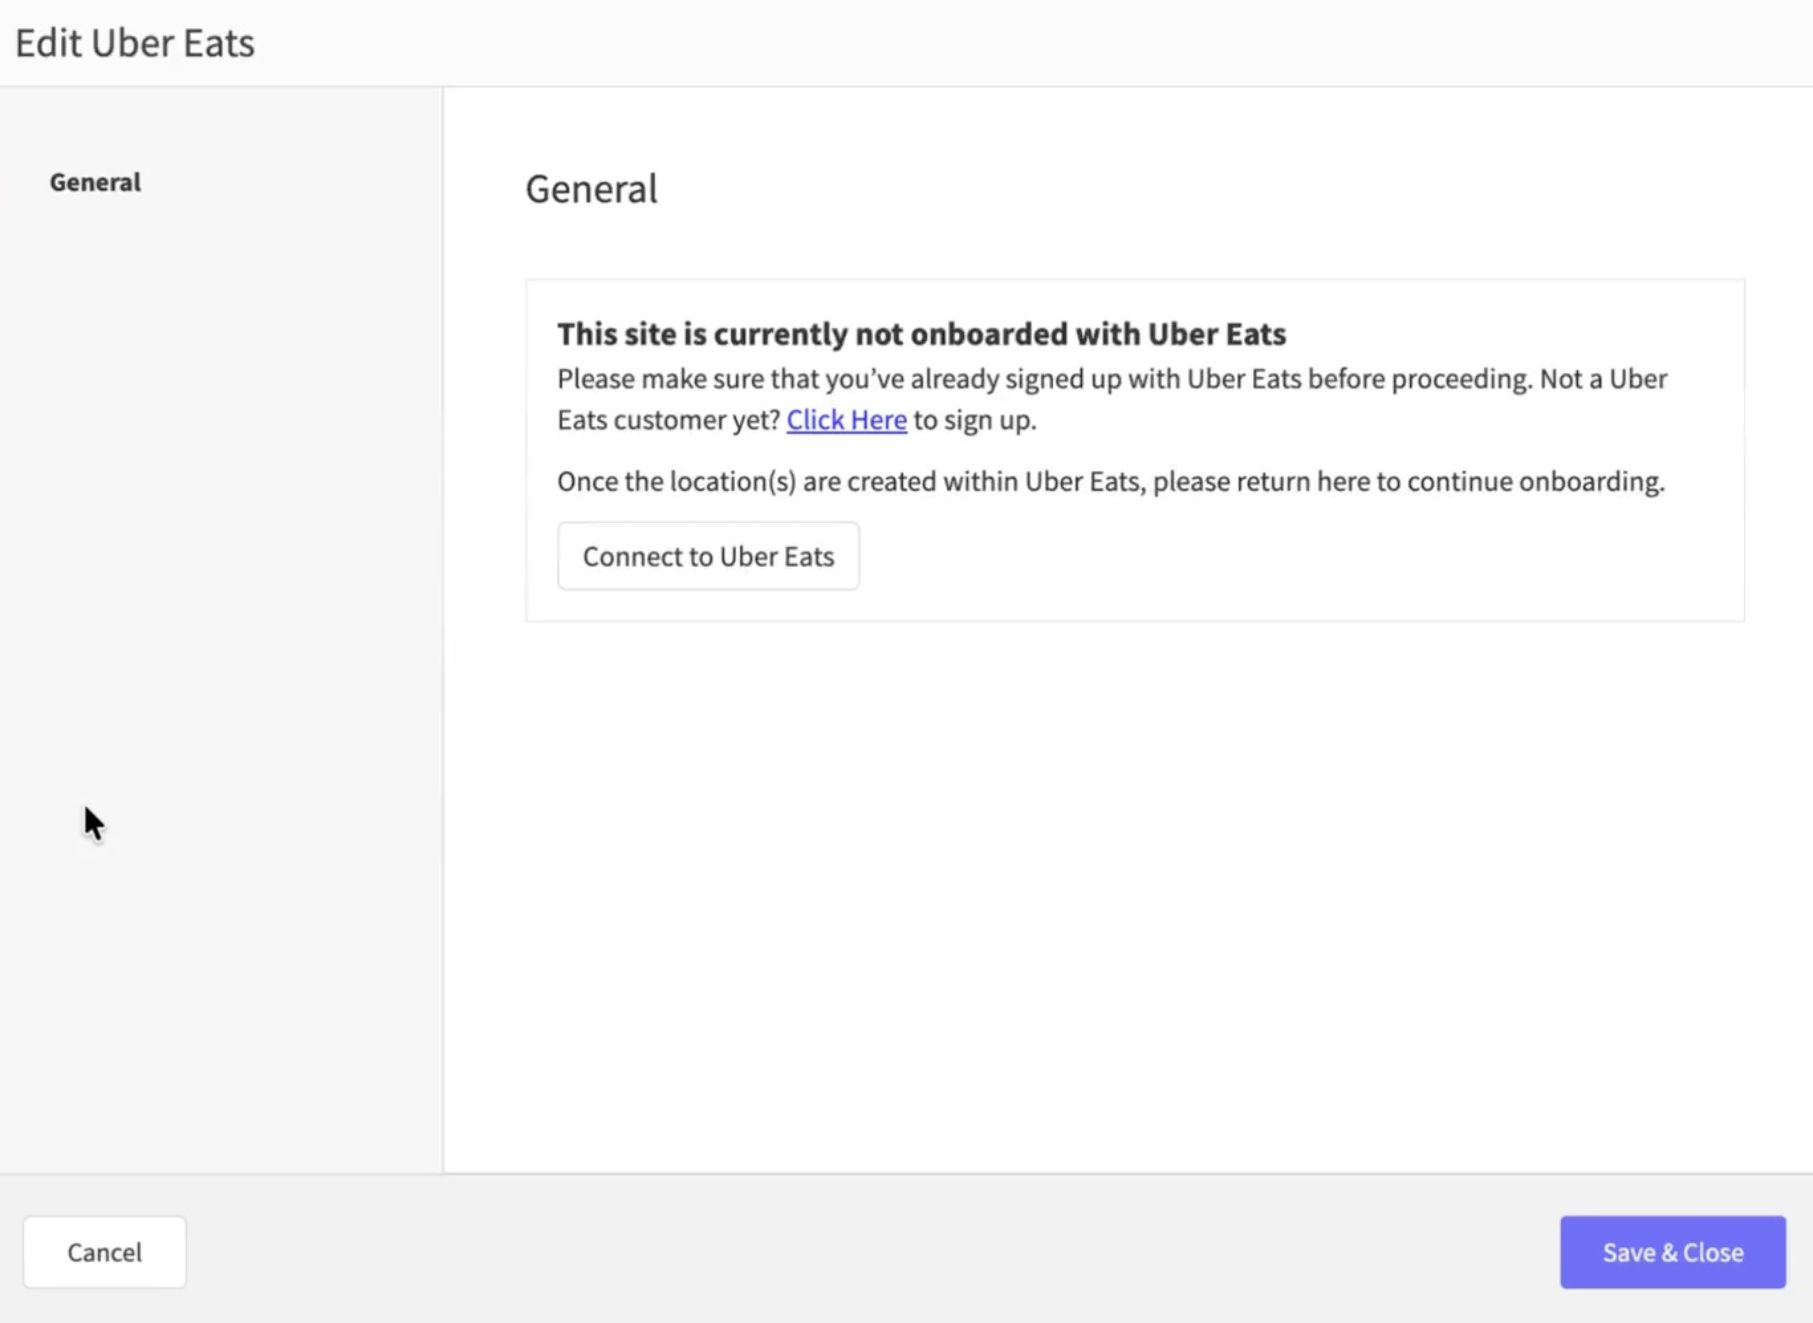
The program will access the Edit Uber Eats panel.
Store & Complete Setup
In the Edit Uber Eats panel, select Click Here to sign up for a new Uber Eats account.
OR If you already have an account, click Connect to Uber Eats.Follow the steps in the Uber Eats portal to sign in or sign up.
Select Store & Complete Setup.
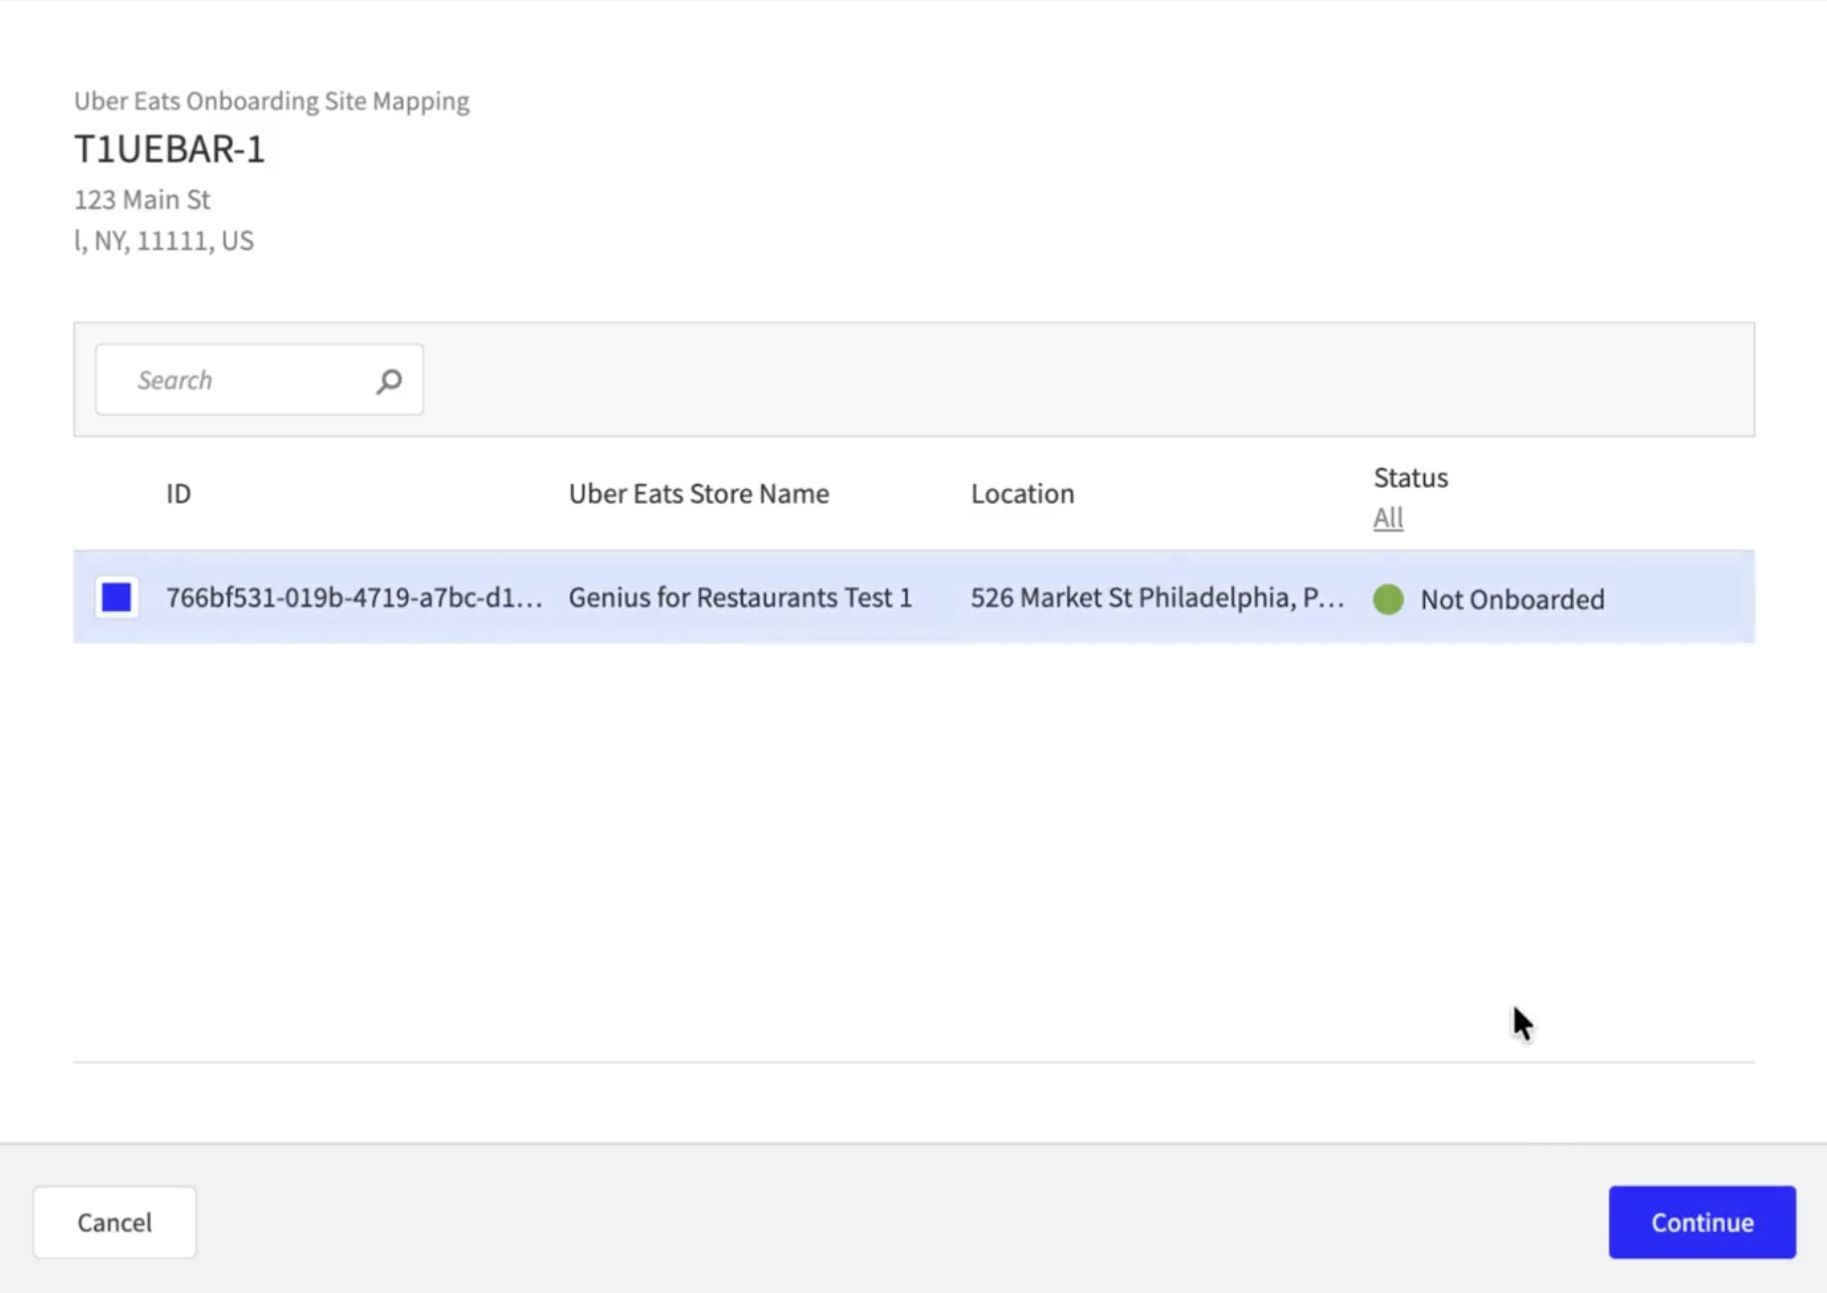
After you sign in, the program will redirect you back to the Enterprise portal.In the list, select the appropriate Uber Eats store, then click Continue.
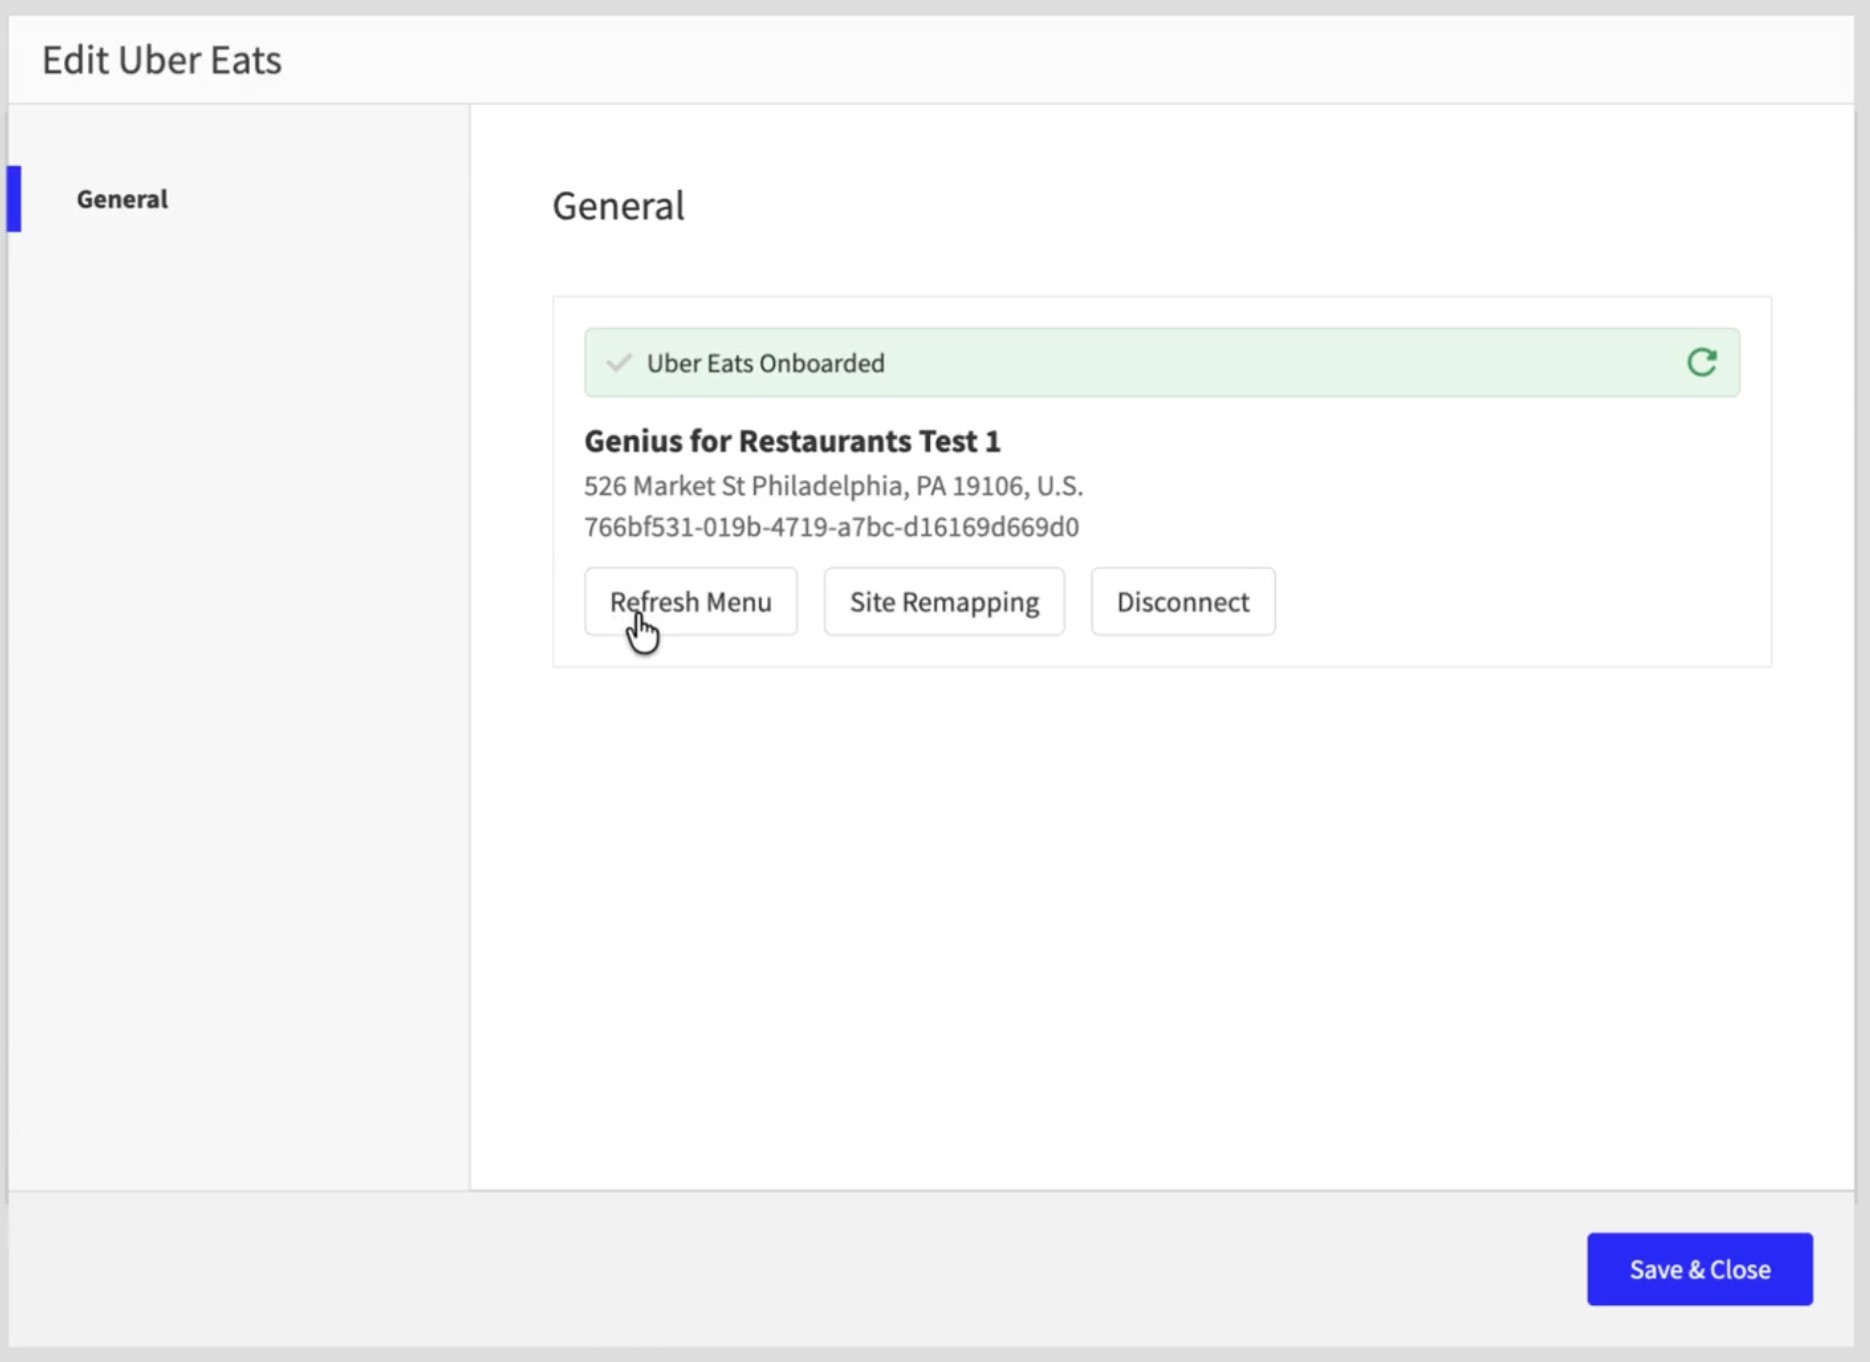
Click Refresh to update the onboarding status.

Once the status displays as Uber Eats Onboarded, click Refresh Menu.
In the confirmation panel, click Refresh.
When the panel closes, click Save & Close.
The program will redirect you to the Genius for Restaurants Admin Portal.
Activate the Uber Eats integration
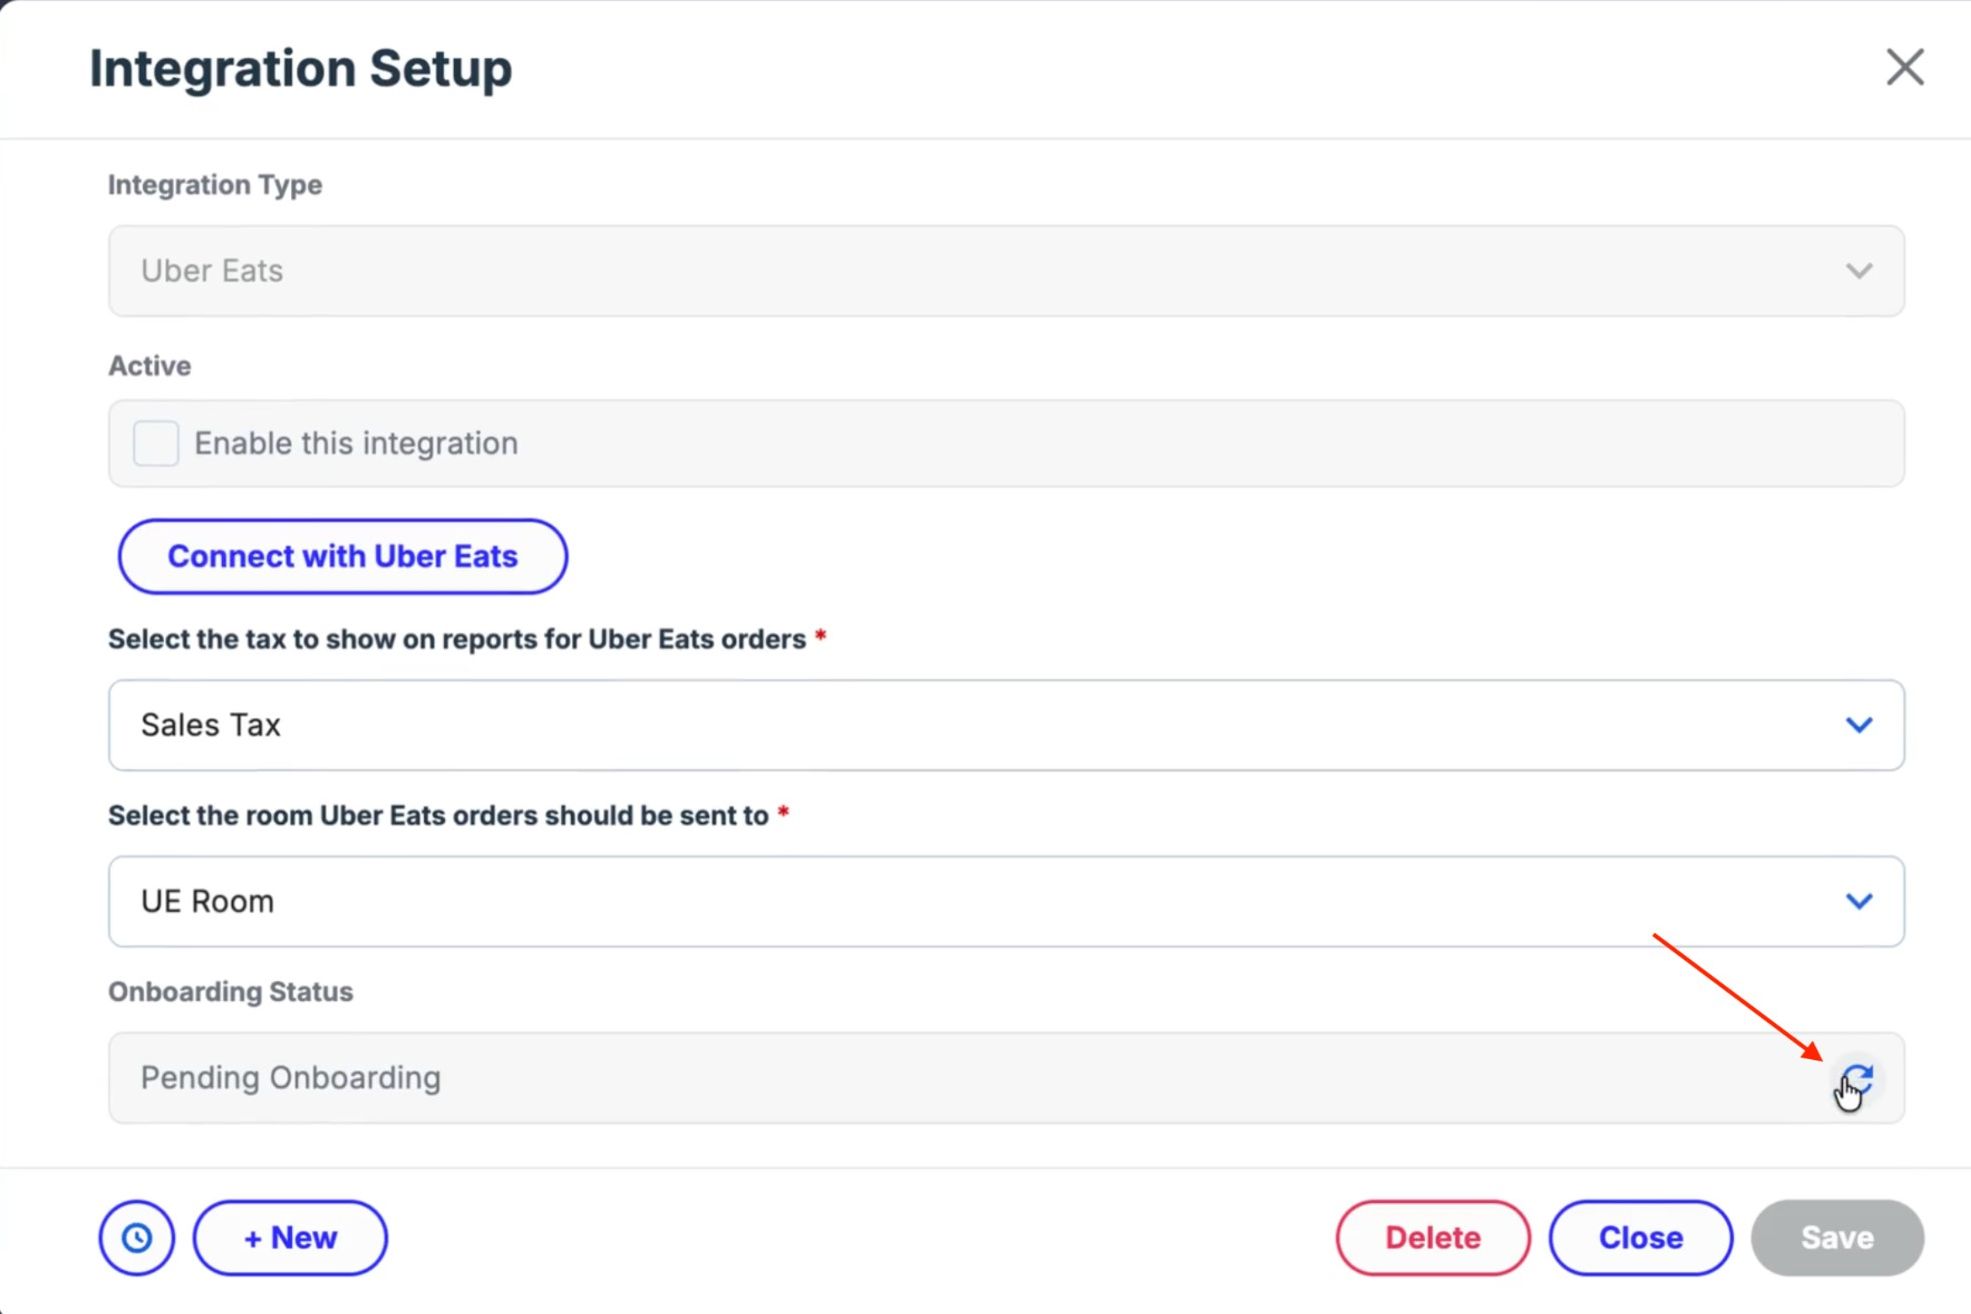
In the Integration Setup screen, click the Refresh icon alongside the Status box.
To enable the integration, select the Active check box.
Click Save to complete the setup.
Uber Eats Integration Status
The Uber Eats Integration Setup panel includes a Status box that provides a simplified, high-level view of the current Uber Eats integration state. This status helps merchants quickly understand whether their store is connected, still being configured, or not currently active.
Status Values
1. Pending Connection
Displayed when:
- The Uber Eats integration has not yet been fully activated.
- Initial setup has not been completed.
- Connection setup is in progress.
- Menu onboarding is in progress.
- A menu publication or menu synchronization is currently running.
The Status box only provides a simplified view of the integration state.
You can review detailed onboarding information, menu publication status, synchronization progress, or specific error details, in the Online Ordering screen. In the Admin Portal's Main Menu, click Location Setup, then click Online Ordering. In the Online Ordering screen, click the Third Party Ordering tab. This page contains the detailed workflow statuses used by the integration and should be referenced when troubleshooting Pending Connection or Not Active statuses.
2. Active
Displayed when:
- The store is fully connected to Uber Eats.
- The menu has been successfully published.
- The store is live and accepting Uber Eats orders.
3. Not Active
Displayed when:
- The store is paused on Uber Eats.
- Setup is incomplete.
- Onboarding has failed.
- Menu synchronization has failed.
- The integration has become disconnected.
Third Party Ordering settings
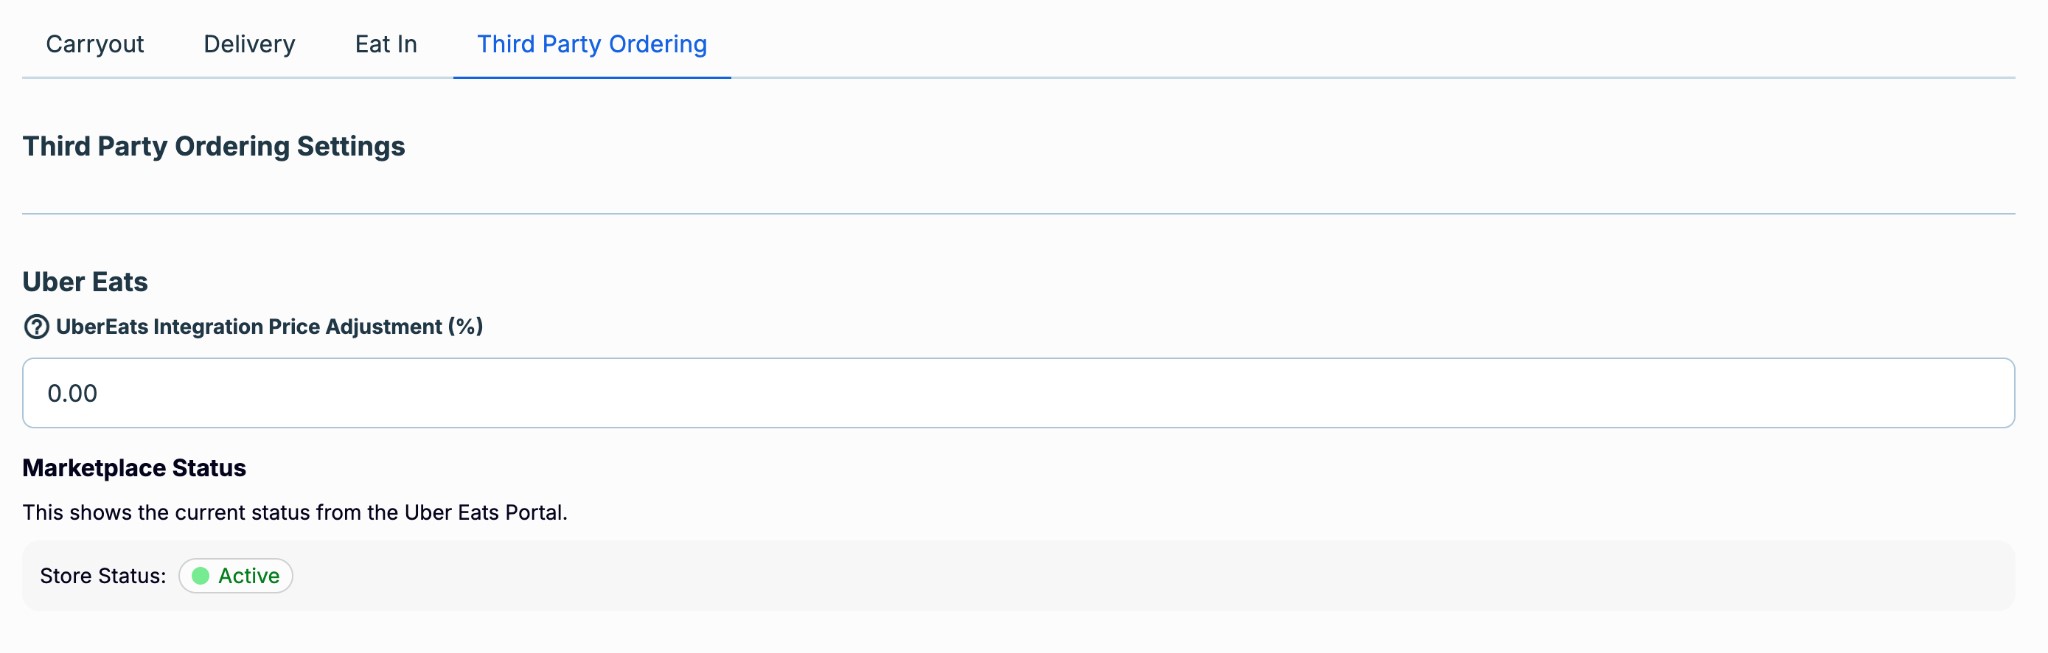
The Third Party Ordering subtab contains an Uber Eats section with a control for setting a delivery price adjustment and a Marketplace Status indicator.
Uber Eats Integration Price Adjustment (%)
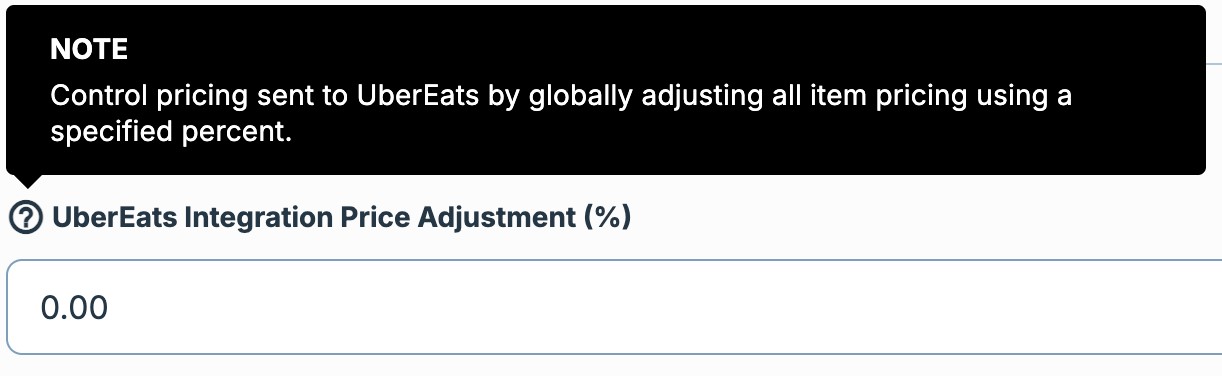
This setting enables you to set the POS to adjust the prices sent to Uber Eats by applying a positive percentage increase to all menu items.
- To increase all item prices by a percentage amount on Uber Eats, enter the percentage amount.
- To send your standard menu prices without any adjustment, enter “0”.
- Do not enter negative values. Negative adjustments are not supported.
The POS will apply this adjustment to all items on the Uber Eats menu.
Marketplace Status
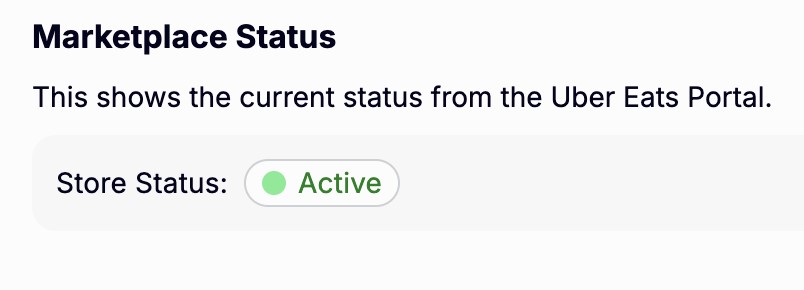
This area displays the live store’s status, retrieved directly from your Uber Eats Portal.
- Active: Your store is currently open and accepting Uber Eats orders.
- Inactive / Paused: Your store is not accepting orders. You may need to update the status in your Uber Eats Portal.
The Marketplace Status indicator is informational only. You cannot edit the status on this page.
Pause / Unpause Uber Eats (NextGen & Classic)
The Pause/Unpause feature allows the location to temporarily stop receiving Uber Eats orders without logging into the Uber Eats website. This can be useful during kitchen backups, staffing shortages, or emergency situations.
Important: Access to the Pause/Unpause control in the POS is controlled by a staff permission.
Permission requirement for Pause Third‑Party Ordering
Access to the Pause Third‑Party Ordering control is determined by the Pause Third‑Party Ordering permission in the Admin Portal’s Permissions screen.
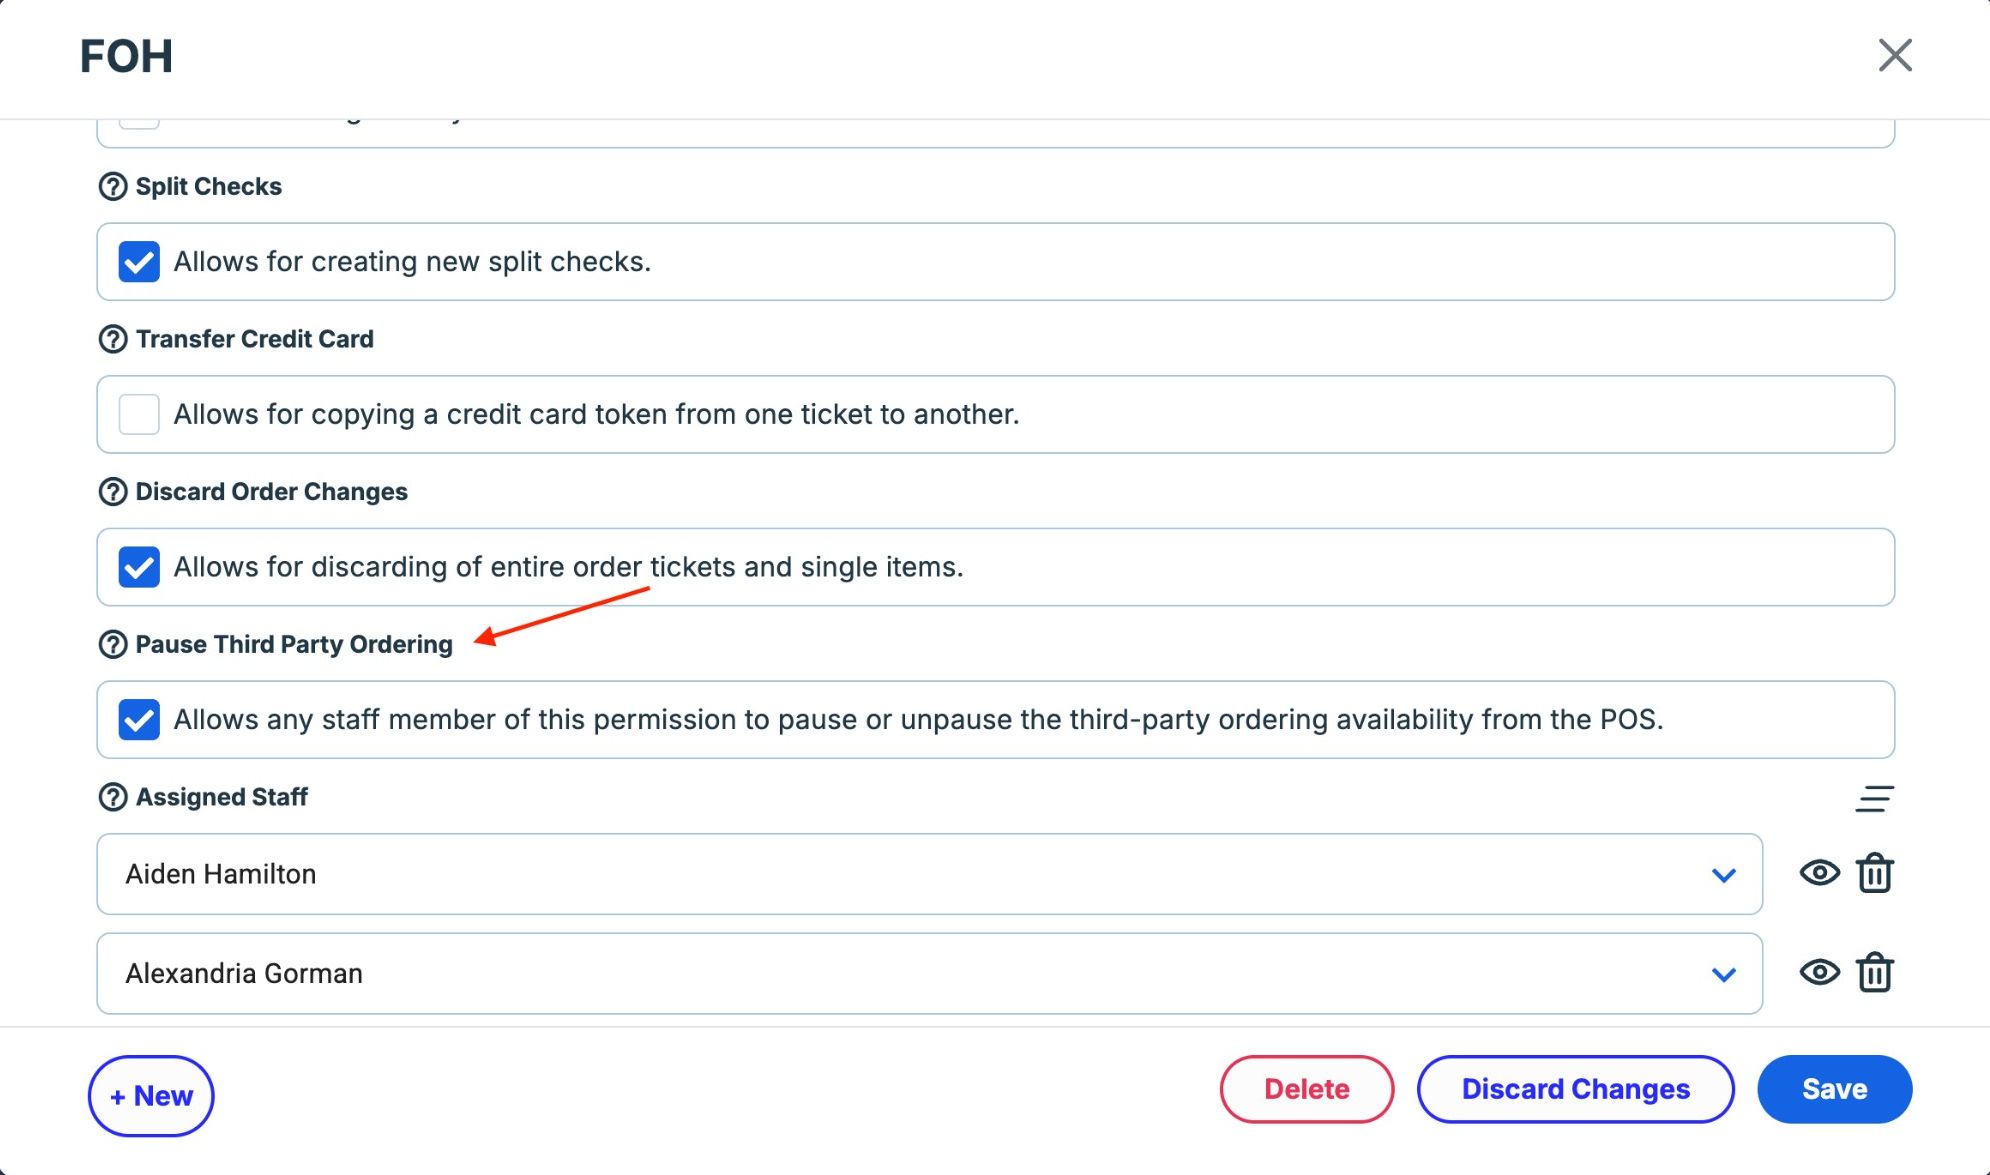
Permission disabled (by default):
- While disabled, staff can view the Third‑Party Ordering control but cannot change its state.
- While disabled, the Third‑Party Ordering button is visible, and the Pause/Unpause actions are disabled.
Permission enabled: - While enabled, staff can switch the Third‑Party Ordering control ON (to accept orders) or OFF (to pause orders).
Admin users: - Users with Admin permissions automatically have access to all current and future permissions, including the ability to pause or unpause Third‑Party Ordering in the POS.
This permission applies to both Classic and NextGen POS.
How to Pause/Unpause on NextGen POS
Tap the Delivery icon in the header.
Switch Accept Orders OFF to pause or ON to resume.
Tap Save.
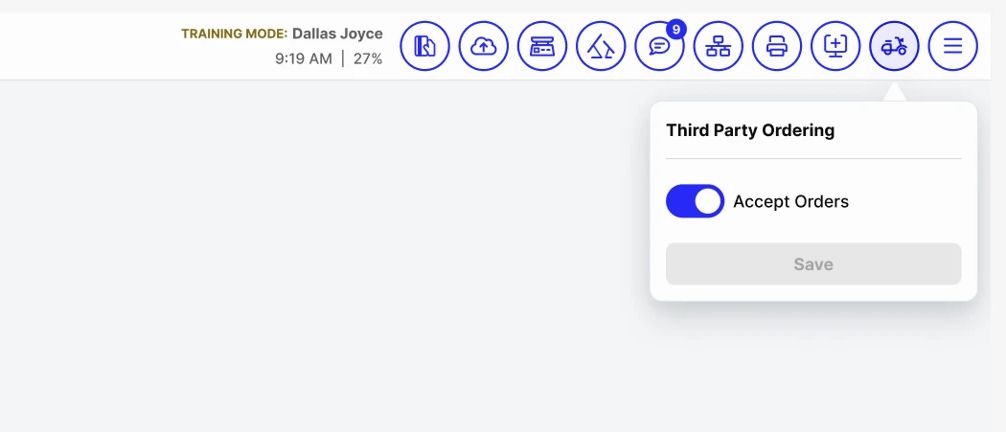
How to Pause/Unpause on Classic POS
Tap the Delivery icon in the header.

Switch the Accept Orders control OFF (to pause orders) or ON (to resume orders).
Tap Save.
Important Pause/Unpause behavior and status details
- The Pause status syncs across all POS tablets and handhelds.
- The POS only reflects actions taken inside the POS.
- If you pause or unpause your store directly in the Uber Eats Merchant Portal, the POS will not update to reflect that change.
- When you toggle Pause/Unpause in the POS and Save, that action overrides the current Uber Eats store status and becomes the live setting.
Example scenarios
If the store is unpaused in the POS, then later paused in the Uber Eats portal:
- The store will be paused on Uber Eats.
- The POS will still show the previous state and will not update automatically.
If you toggle Pause/Unpause again in the POS: - The POS action will override and set the live Uber Eats store status.
Verifying Uber Eats Portal status
To confirm whether the store has been paused directly from the Uber Eats portal, access the Third Party Ordering subtab in the Online Ordering screen. Online Ordering screen.
Check the Marketplace Status indicator to verify the current Uber Eats state.
Marking orders as Ready for Pickup (NextGen & Classic)
Marking an order as Ready for Pickup notifies Uber Eats that the order is prepared.
This improves courier timing for delivery orders and helps customers know when pickup orders are ready.
Notes:
- The button becomes inactive after use and cannot be pressed again.
- The updated state synchronizes across all devices.
- Pickup orders display a visible “ready” state in Uber Eats.
How to mark an order as Ready for Pickup in NextGen POS
Open the Uber Eats order.
In the Actions panel, tap Ready for Pickup.

Confirm the action when prompted.
How to mark an order as Ready for Pickup in Classic POS
- Open the Uber Eats order.
- Tap Ready for Pickup in the left panel under Reprint.
- Confirm when prompted.
Contact customer (phone number and PIN)
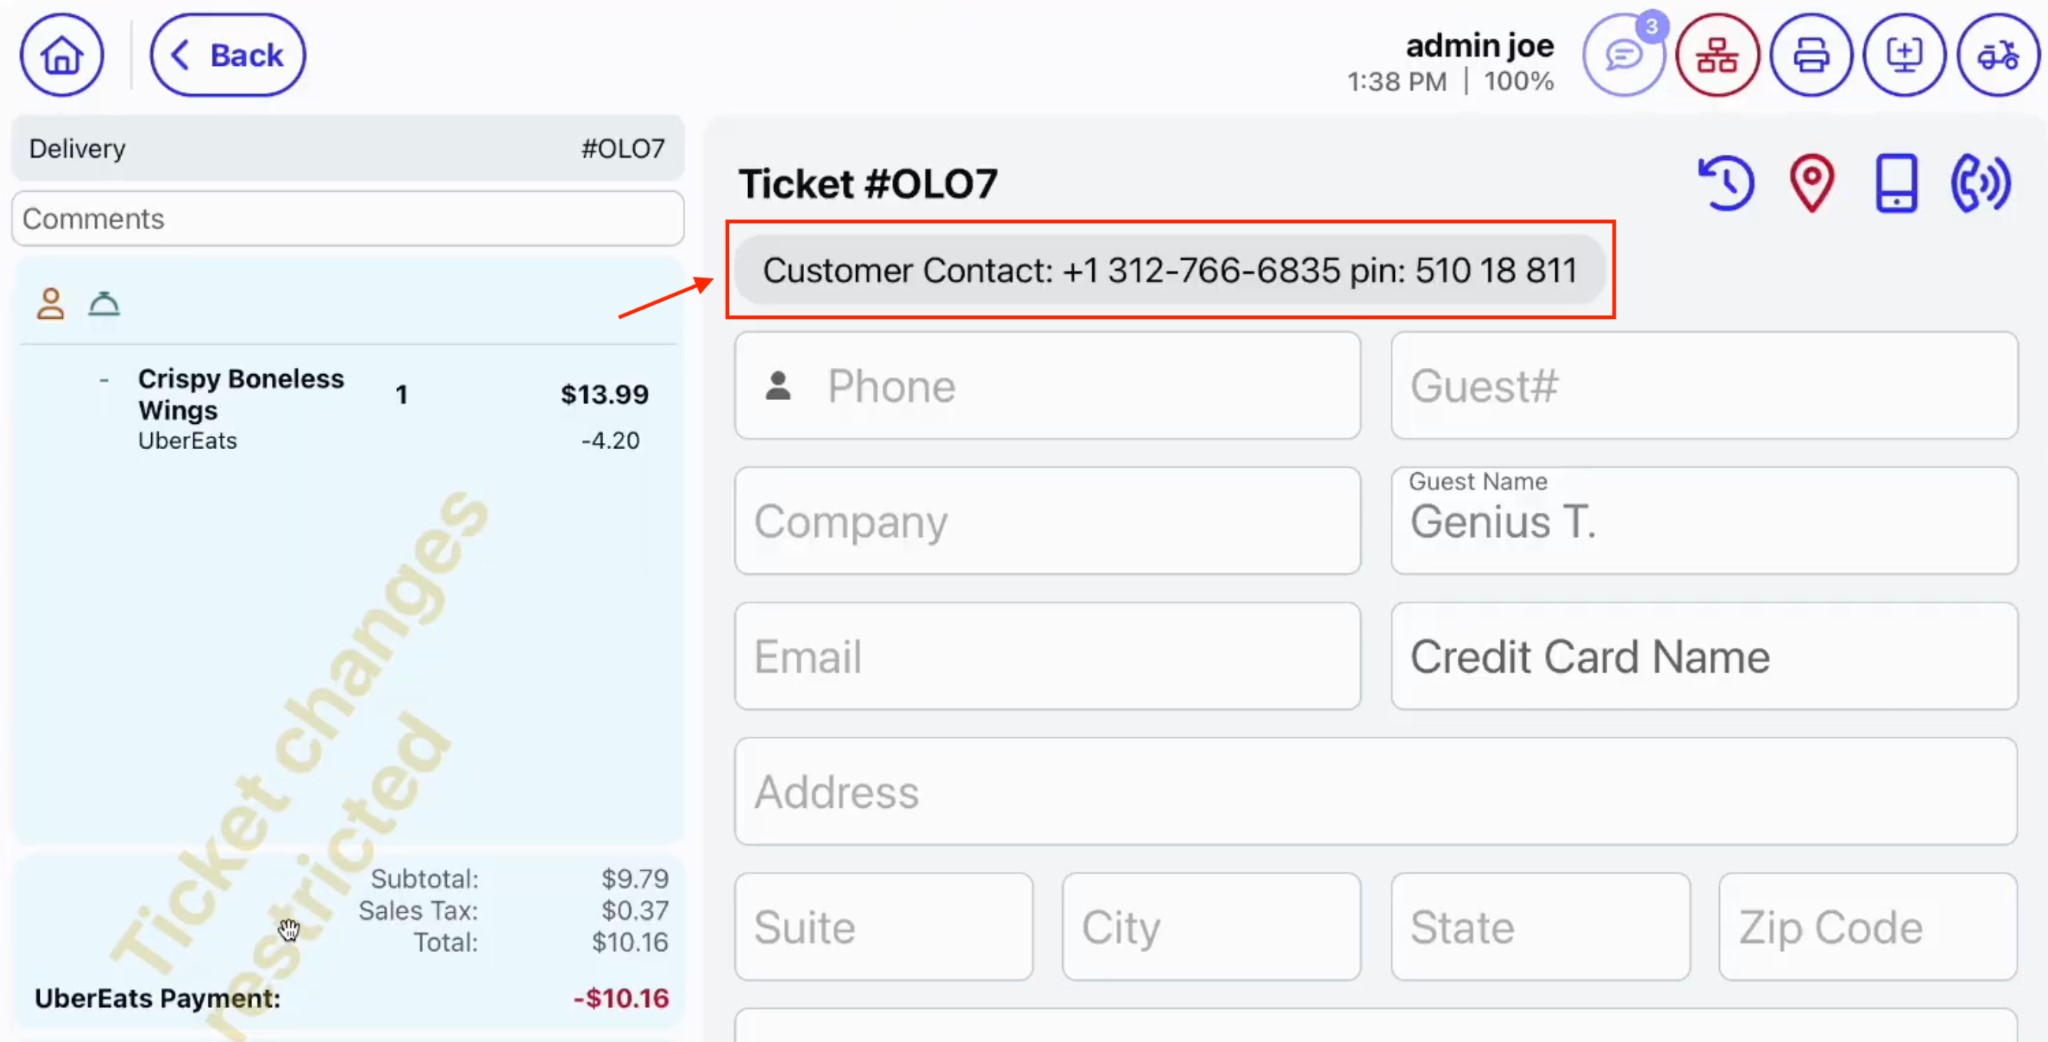
Uber Eats provides a customer phone number and one‑time PIN so you can reach customers through Uber Eats’s protected calling system. This helps staff clarify orders, handle substitutions, or resolve issues quickly.

It displays as follows: Customer Contact: [phone number] Pin: [PIN].
In NextGen, the contact information displays in the Customer Panel on Uber Eats orders, whereas in the Classic POS it displays in Ticket Info.
Supported discounts
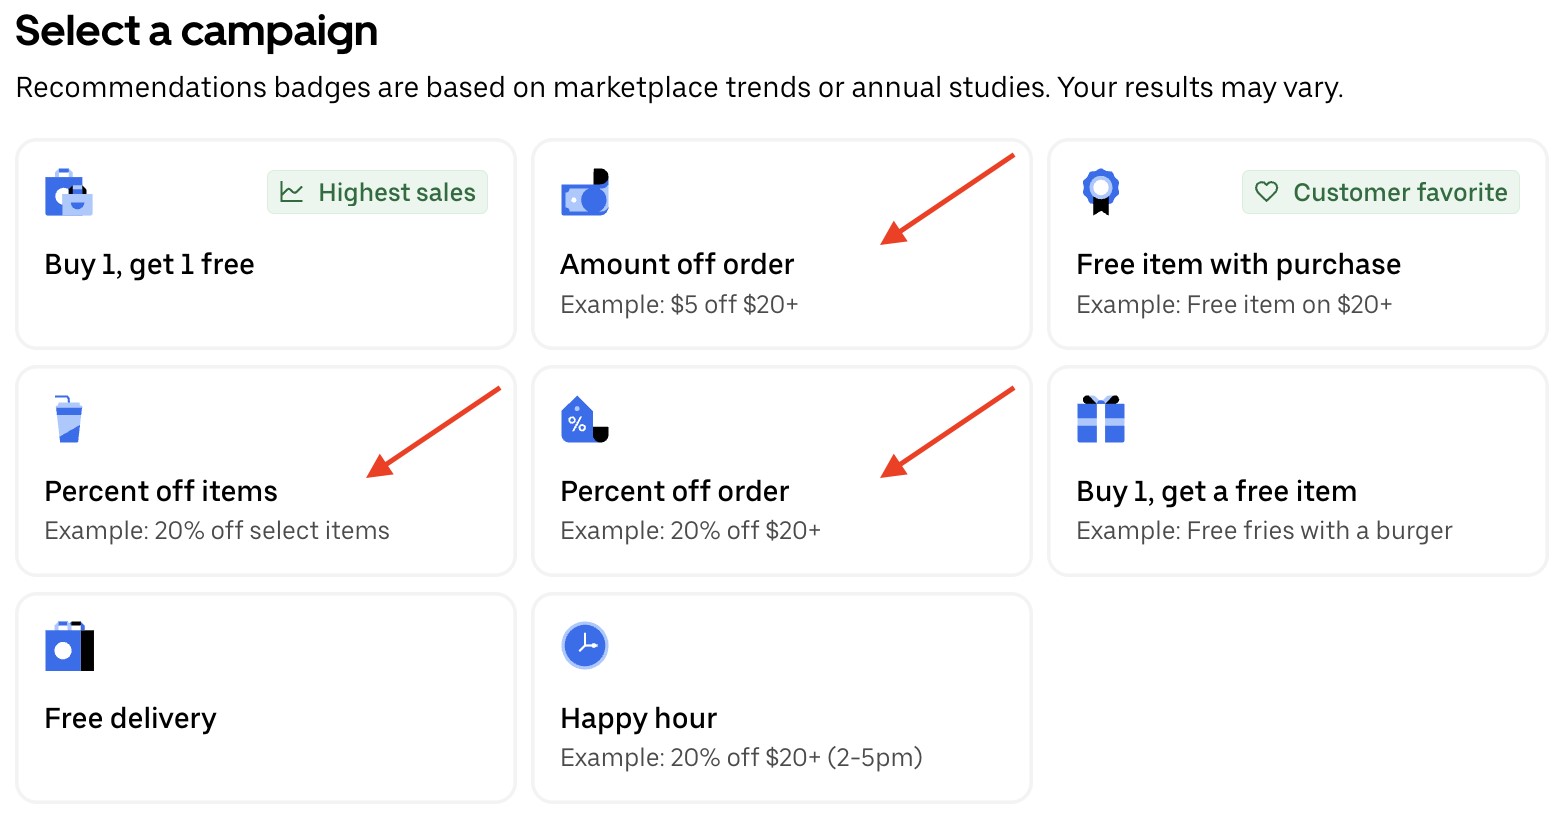
Your integration currently only supports item-level and order-level discount types available in the Uber Eats Manager:
- “Amount off order”, “Percent off order”: Order-level discounts, referred as “Adjustments” in Genius for Restaurants.
- “Percent off item”: Item-level discount, referred to as “Discounts” in Genius for Restaurants.
Configuring item-level discounts
- When creating an item-level discount in Uber Eats Manager portal, select Advanced Settings.
- In the External Promotion ID box, enter “uber-item-discount”.
ubereats-setup-20.jpg
Configuring order-level discounts
- When creating an order-level discount in Uber Eats Manager portal, select Advanced Settings.
- In the External Promotion ID box, enter: “uber-order-discount”.
ubereats-setup-21.jpg

Nested Subitem Support & Configuration
The Uber Eats/Genius integration supports item configurations that include subitems (nested modifier items), subject to the hierarchy limitations outlined below.
Supported Hierarchy (up to 3 levels deep)
The integration supports menu structures up to three levels deep beneath the parent item.
- Item
└─ Subitem
└─ Subitem
└─ Ingredient
Not Supported
- Item
└─ Subitem
└─ Subitem
└─ Subitem
└─ Ingredient
Important: If a fourth level is present, the affected item will not appear on Uber Eats.
Additional Considerations
Circular Reference
Items cannot reference themselves as subitems.
Example:
Burger
└─ Burger
Any item with a circular reference will not appear on UberEats.
Subitem Out-of-Stock Support
When a subitem is marked out of stock in Genius, Uber Eats respects the availability status and prevents customers from selecting that option.
Min/Max Selection
The integration supports Min/Max selection rules configured at the modifier level.
Customers will see messaging similar to: Please choose from X to Y.
Where:
- X = Minimum selections required
- Y = Maximum selections allowed
Note: While Min/Max selection enforcement is supported, duplicate (quantifiable) selections of the same subitem are not. As a result, Uber Eats displays these options as check boxes rather than quantity selectors.
Current limitations
The following items are not supported in the current Uber Eats integration:
- Half‑and‑Half menu items
- Pricing rules
- Weighted measurements
- Alcohol ordering
- Ingredient-level "Invisible for Online Orders" flag limitation
FAQ
Do I need to mark an order as ready before a courier arrives?
No. You do not need to manually mark an order as ready for pickup.
Uber Eats automatically manages courier dispatch based on the prep time you set in the Uber Eats Manager portal. Uber Eats may also adjust pickup timing using historical order and courier data to help ensure couriers arrive at the right time.
Does this integration support “Uber Direct” deliveries?
No. Uber Direct is not currently supported.
This means you cannot use Uber’s courier network to deliver orders placed through Genius Online Ordering. Support for Uber Direct is planned for future implementation to provide more flexible delivery options.
Is there a maximum price limit for items on Uber Eats?
Yes. Uber Eats enforces a maximum price limit for individual menu items.
By default, this limit is typically \$375 per item.
Why is an ingredient appearing on Uber Eats even though it is marked "Invisible for Online Orders" in Genius R?
The integration does not currently support the "Invisible for Online Orders" setting at the ingredient level (Item > Modifiers > Ingredients > Invisible for Online Orders). As a result, ingredients marked with this setting will still be included in the menu data sent to Uber Eats and may appear to customers as selectable modifier options.
What happens if a customer selects an ingredient that is marked "Invisible for Online Orders" in Genius R?
Orders containing that ingredient may fail to process through the integration. Because the ingredient is still published to Uber Eats but is not supported by the integration, the order can be rejected during order transmission.
Can I use the "Invisible for Online Orders" setting to hide modifier ingredients from Uber Eats?
No. The integration ignores this setting for ingredient-level modifiers. Merchants should not rely on this setting to control modifier visibility on Uber Eats, as doing so can lead to failed orders.
If I mark an item or modifier out of stock, will customers still see it?
No. Marking an item or modifier out of stock prevents customers from adding it to their cart.
If the item was already in a customer’s cart, Uber Eats will notify them and ask them to update their selection before placing the order
Are location‑specific prices supported?
Yes., location‑specific pricing is supported. If you configure different prices for items by location, customers will see the correct pricing for each location on Uber Eats.
Can both an Item and an Order discount be applied to the same order?
No. At this time, only one type of discount can be applied to a single order.
If both an Item Discount and a Storewide Discount are configured and applied to the same order, the order will fail. We’re actively working on enhancements to support more flexible discount combinations in a future update.
How can I differentiate between a courier pick-up and a customer pick-up?
If the order comes through to the POS as a Delivery order, this means that the order is expected to be picked up by a courier. Conversely, if the order comes through to the POS as a pick-up order, this means that the order is expected to be picked up by the customer.
I used Self Sign-Up (SSU) to create a new Uber Eats account. Why is the integration still showing Pending Connection?
If you completed the Uber Eats Self Sign-Up (SSU) process and created a new Uber Eats account, activation is not always immediate. Uber may take up to 3 business days to activate newly created accounts after SSU is completed. During this time, the integration may display Pending Connection, and the Uber marketplace status may appear as Inactive or Paused.
Note: This guidance applies only to Self Sign-Up (SSU), where a new Uber Eats account is created. It does not apply to Self Sign-In (SSIO), where an existing Uber Eats account is connected. If fewer than 3 business days have passed since SSU completion, no action is typically required. If the activation has not completed after 3 business days, please contact Uber Support for further investigation.